A good digital menu isn't just a PDF hiding behind a QR code. It's a living page that loads in under two seconds, reads well on a 5-inch screen, and lets you change a price without reprinting anything. If that sounds like a bigger project than it used to be, it isn't — most restaurants can launch a working digital menu in an afternoon, or under ten minutes if you let an AI menu importer read your existing PDF. This guide walks through every step, from how guests actually reach the menu to where to put the first tap target at the table.

Try it free — no credit card required
You can build the whole thing on the free plan: unlimited menu items, QR codes, NFC-ready URLs, and 44+ language translations. The walkthrough below uses Tappflow as the reference platform.
What is a digital menu?
A web page that shows your menu on a guest's phone. Guests reach it by scanning a QR code, tapping their phone to an NFC tag, or typing a short URL. You manage items, prices, and sold-out toggles from a dashboard; you see which items actually get viewed.
A digital menu is not a PDF of your printed menu uploaded to your website. PDFs zoom poorly on mobile, don't update instantly, and give you zero analytics. If that's what you have today, this guide is for you.
Why restaurants are switching in 2026
Three things shifted the economics: print costs keep rising, menus change faster than they used to (daily specials, sold-out items, seasonal swaps), and the features that actually drive repeat visits — analytics, loyalty signup, review capture — only work if your menu is digital.
The concrete wins, in plain language:
- Instant updates. Change a price, 86 a dish, or add today's special in seconds. No reprinting, no staff-side tickets.
- Multi-language. Translate sections, item names, descriptions, and dietary tags into 40+ languages from one source of truth.
- Dietary tags. Halal, vegan, vegetarian, gluten-free, dairy-free, nut-free, spice level — guests find what they can eat in seconds instead of flagging a server.
- QR and NFC access. Scan or tap. No app download, no sign-up, no friction.
- Analytics. Which dishes get viewed, which tables are busiest, which languages your guests read — data you can't get from print.
- Lower running cost. No lamination, no quarterly reprints, no scrambling when a supplier doubles the tuna price.
What you'll need before you start
- A free account on a digital menu platform (email + password is enough).
- Your restaurant's name, address, phone number, and hours.
- Optional but recommended: a PDF or photo of your existing menu — modern platforms will OCR it and build your digital menu automatically in a few minutes.
That's it. No designer, no developer, no printer.
Step 1: Choose how guests access it
Before you pick software or write a single menu item, decide how guests will reach the page. There are three credible options:
- QR code. Cheap, universal, but friction-heavy — guests open the camera, aim, and tap a notification.
- NFC tag. One tap, no camera. Works on every iPhone from 2016 and every modern Android.
- Hybrid. Both on the same table tent — NFC for the fast path, QR for the fallback.
The right answer depends on your venue. A food truck can get away with a single QR sticker. A full-service restaurant with 20 tables will see meaningfully higher engagement with NFC on each table, especially after staff start saying “just tap the card for the menu.” The nuance here is covered in more depth in our NFC vs QR comparison for restaurants, but for most full-service venues in 2026 the hybrid answer is correct.
Integrated platforms like Tappflow ship the NFC tags, the hosted menu, and the analytics in one dashboard, which skips the stitch-work. Whatever you pick, the steps below apply.
Step 2: Structure your menu content
Before you open a dashboard, get your menu out of your head (or out of your kitchen) and into a plain structure. A simple spreadsheet with these columns works:
- Section (Starters, Mains, Desserts, Drinks)
- Item name
- Description (1–2 sentences, sensory not generic)
- Price and variants (size options, e.g., “small / large”)
- Allergens and spice level
- Dietary tags (vegan, vegetarian, gluten-free, dairy-free, halal)
- Prep time and calorie count (optional)
- Photo URL (optional — but high-value for 3–5 hero items)
Most platforms will accept a CSV import. Even if you plan to enter items manually, the spreadsheet step forces you to notice inconsistencies (one dish has a photo, eight others don't; prices jump from $14 to $22 with nothing in between). Fix those before they're visible to guests.
If your menu already exists as a photo or PDF, skip the typing: some platforms will OCR a menu image and extract items, prices, variants, and dietary tags into a structured digital menu in minutes. Tappflow does this, with a review step to catch anything the model misread — 50 items in under ten minutes instead of an hour of data entry.
Step 3: Pick your menu software
There's no universal best. What to look for:
- Sub-second page loads on mobile. Test a live demo on your own phone on cellular data. If it's slow, pass.
- Instant updates. Change a price and confirm guests see the new number on their next interaction.
- No forced guest account. Anything between the scan and the menu — signup, app install, email wall — cuts adoption.
- CSV export. You'll switch platforms eventually. Make sure you can leave with your menu.
- Per-item analytics. Views and interactions per dish tell you which descriptions work and which don't.
- A free tier that's actually usable. You shouldn't need a credit card to see if the thing works for your venue.
Six credible options, ranked with real trade-offs, are in best digital menu software for small restaurants.
Step 4: Design for mobile-first reading
Your menu will be read on a phone held one-handed, often in low light, often while someone is also holding a drink. Design choices follow from that:
- Font size 16px minimum. No one is pinching to zoom. They're leaving.
- High contrast text. Light-gray-on-white looks elegant on a designer's monitor and unreadable on a phone at a dim table.
- Sections collapsible or anchored. A scrolling wall of 80 items kills intent.
- Photos selective. Hero items only. Every item photo slows the page and dilutes the signal.
- No auto-playing video. It drains battery and rarely converts.
Tip
Run the menu through Google's Lighthouse (in Chrome DevTools). Aim for Performance 90+ on mobile. This is both a UX check and an SEO signal.
Step 5: Go multilingual — 44+ languages from one source
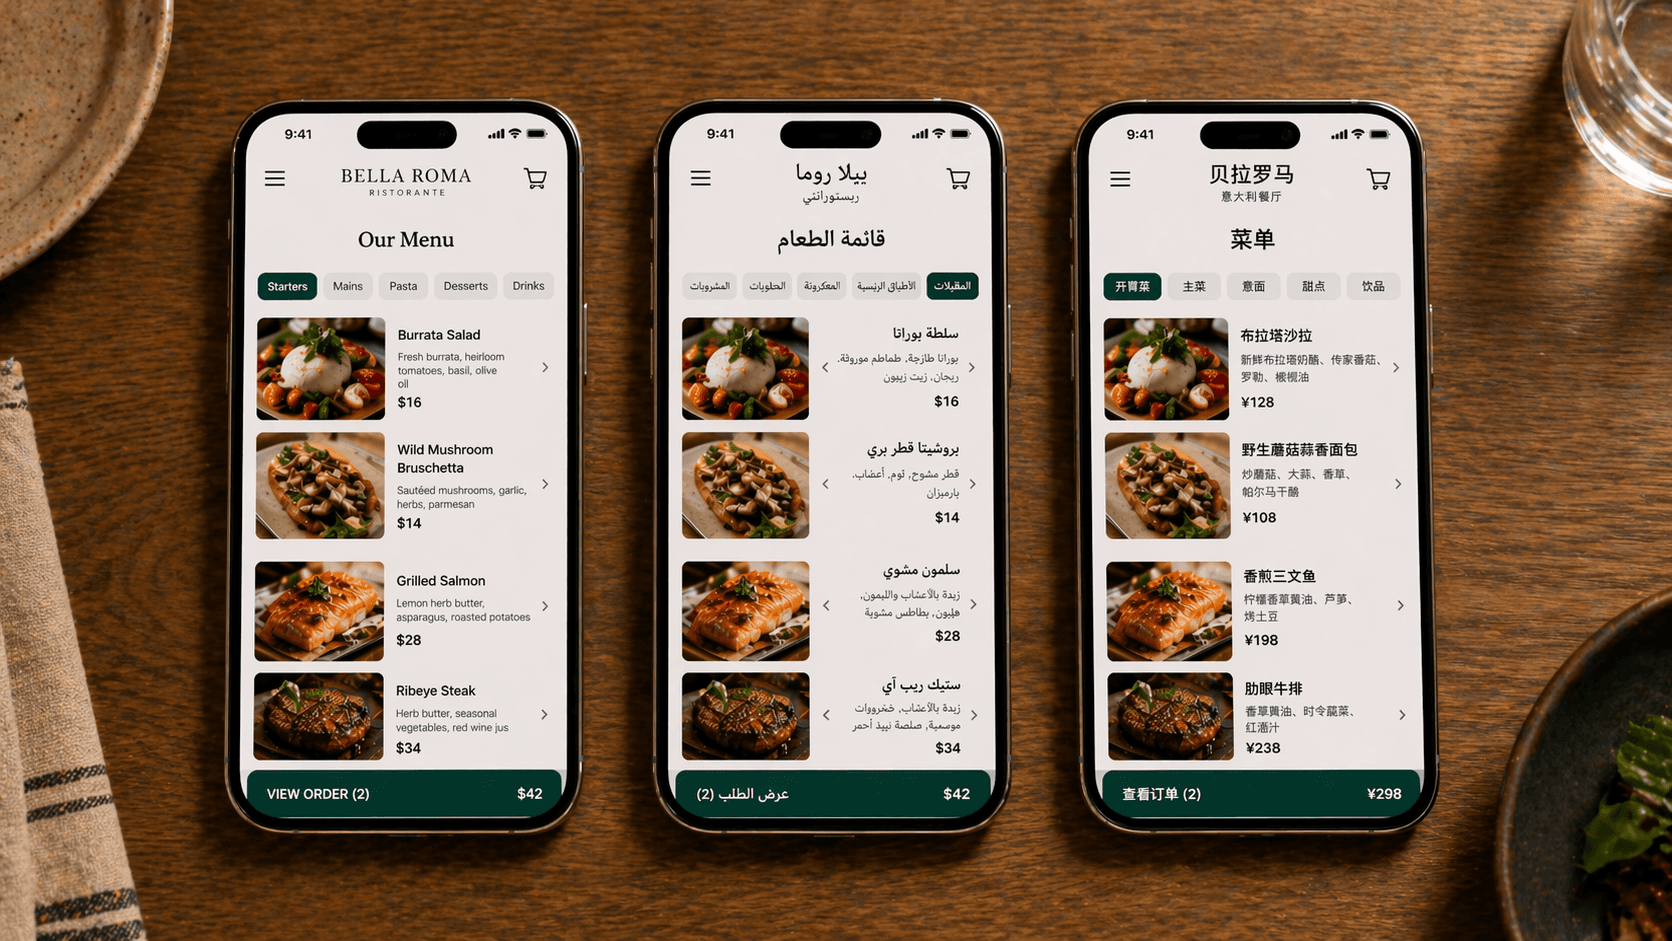
If a meaningful share of your guests read a language other than your default — a real question in Toronto, Vancouver, Montreal, Dubai, or London — an English-only menu leaves money on the table. The move isn't to maintain four separate menus. It's to write one and have the platform render it in whatever language the guest's phone is set to.
Tappflow covers 44+ languages including Arabic, Urdu, Farsi, and Hebrew (with right-to-left handled correctly), plus Spanish, French, Italian, Portuguese, German, Dutch, Mandarin, Cantonese, Japanese, Korean, Hindi, Bengali, Tamil, Punjabi, Russian, Turkish, Greek, and Polish. You select the languages you want; the platform translates sections, item names, descriptions, and dietary tags, and keeps them in sync every time you edit an item.
Step 6: Stand it up — a 10-minute walkthrough
Enough theory. Here's the fastest credible path from zero to a live QR and NFC menu, shown in Tappflow. If you're using a different platform, the steps map one-to-one; only the screens look different.
6.1 Create your account

Head to app.tappflow.com and create an account with email and password, or sign in with Google. The free plan supports one restaurant with unlimited menu items — more than enough to get live today. No credit card.
6.2 Add your restaurant

Your restaurants dashboard is the home for every venue you manage (one location today, multiple later if you grow). Click Add a Restaurant to create your first one.
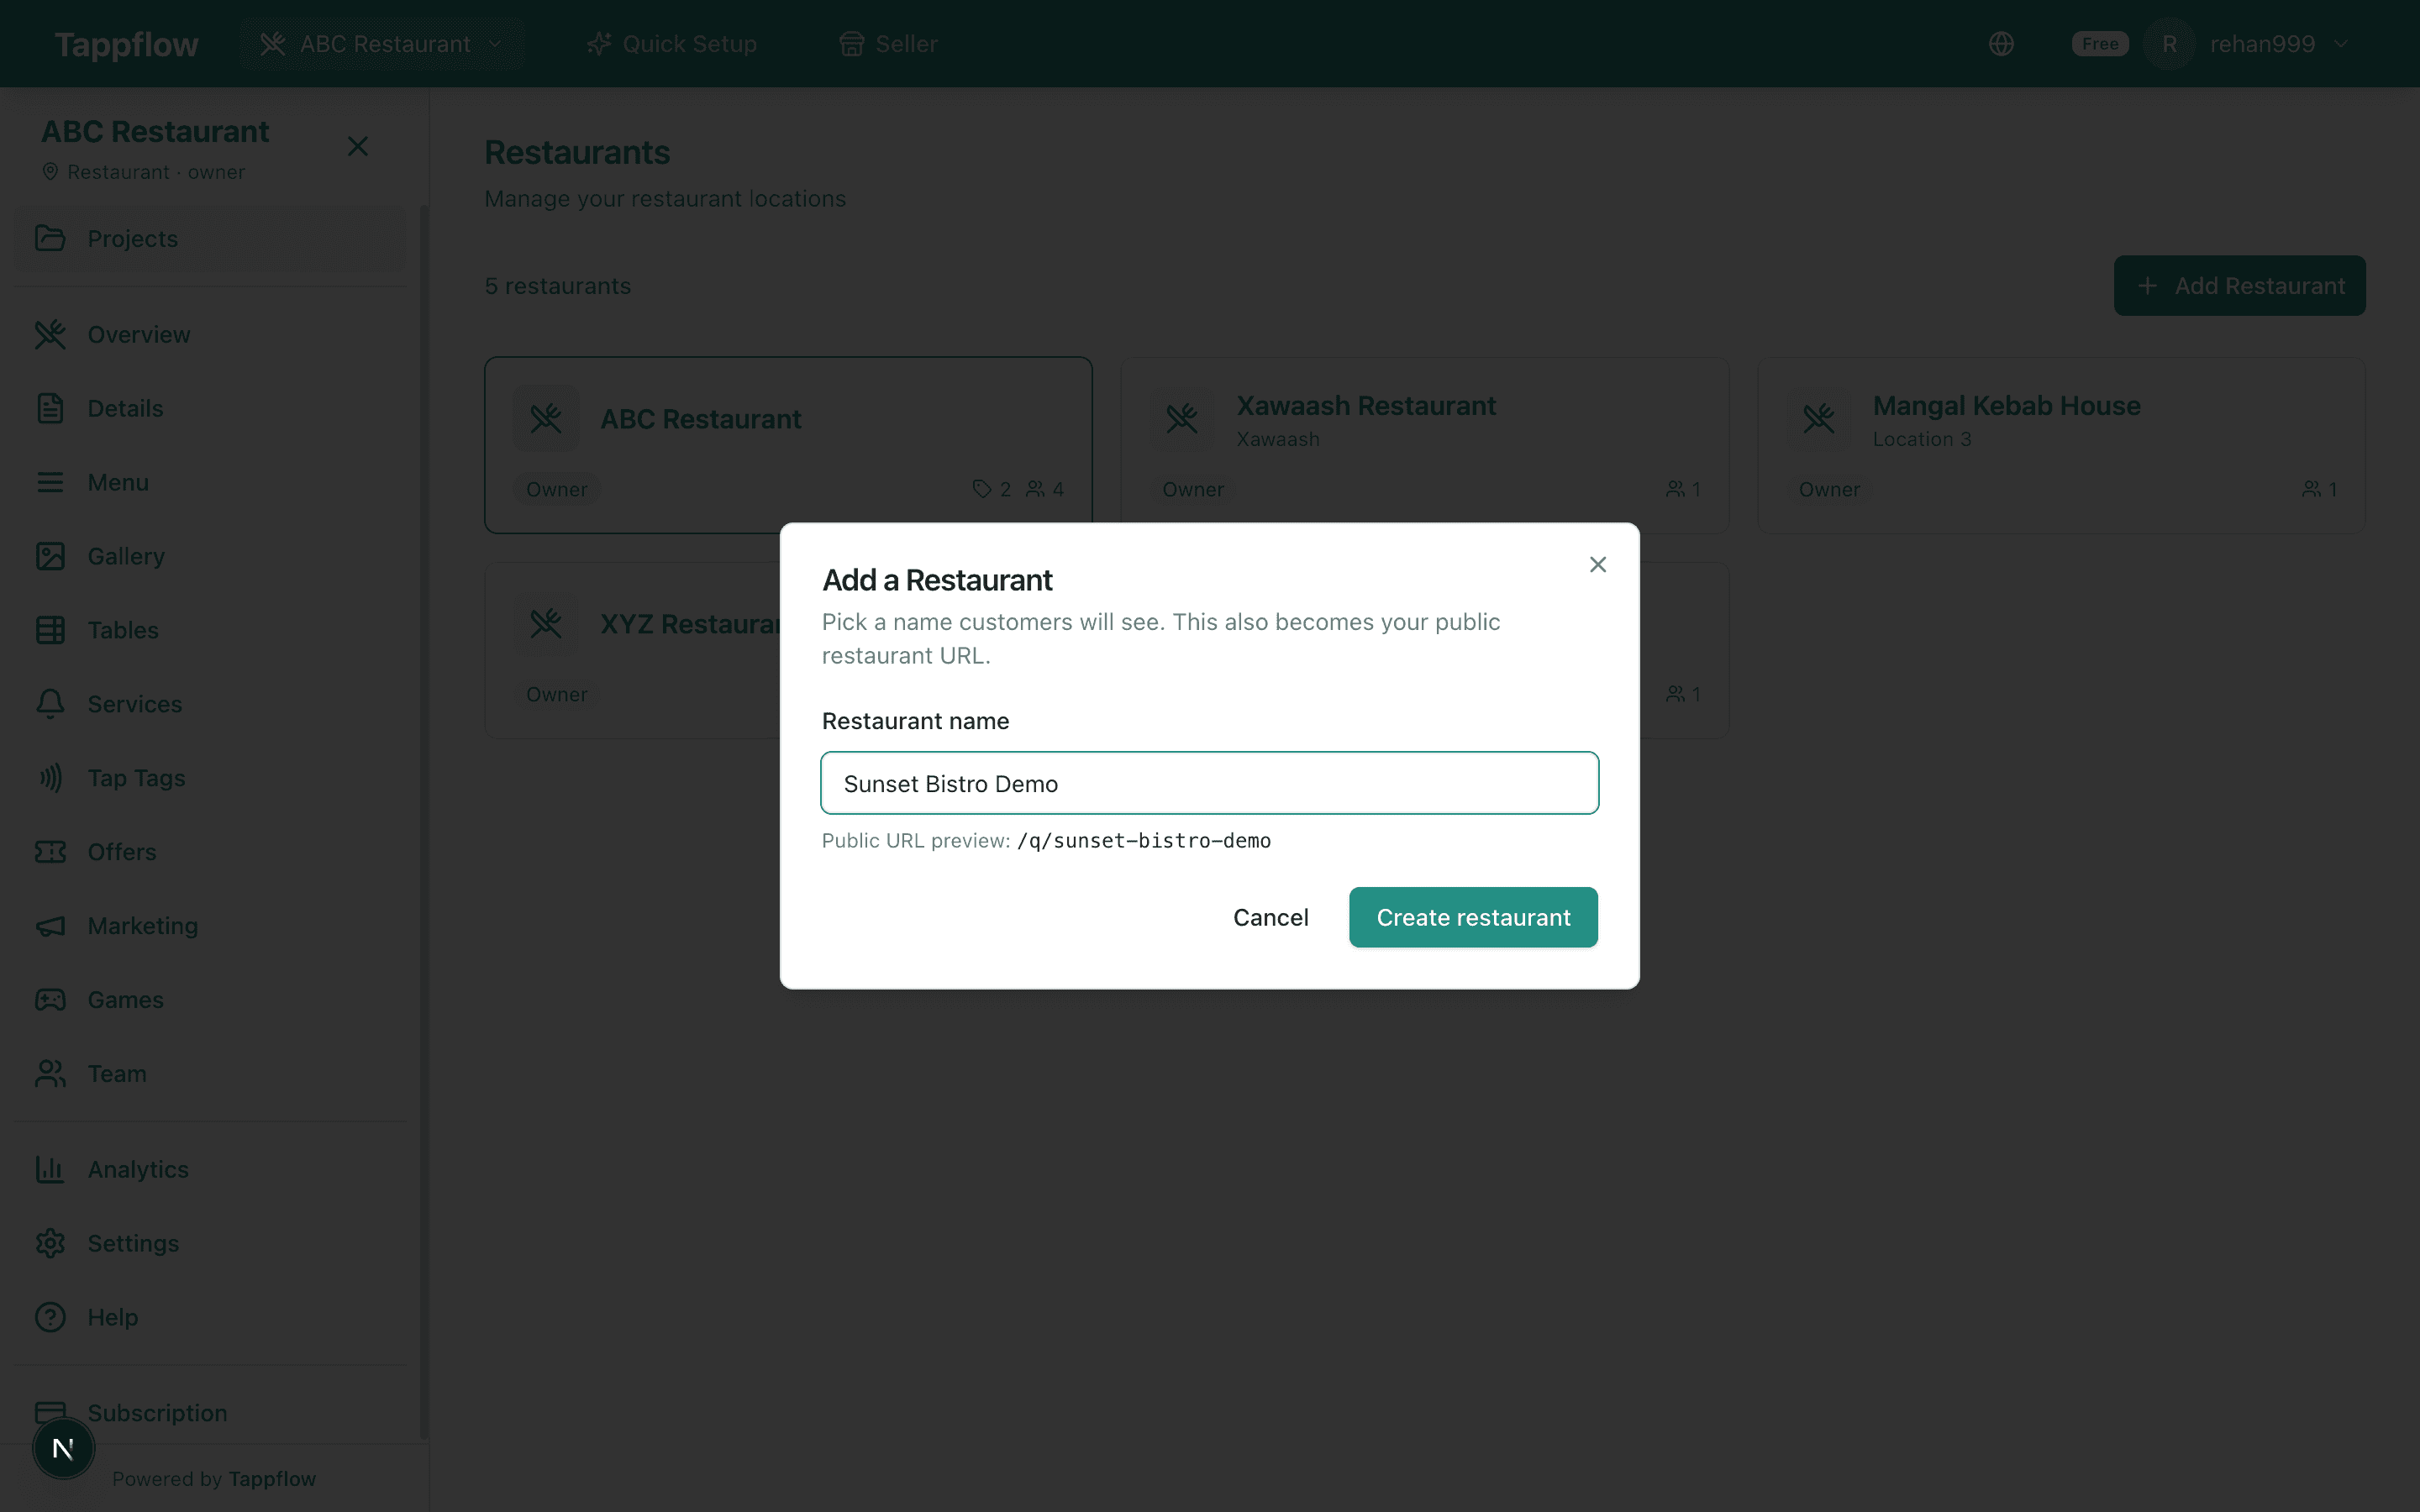
Name it the way guests will recognise it — Sunset Bistro, not Sunset Bistro LLC. Tappflow generates a clean public URL (/q/sunset-bistro) as you type; this becomes the exact address the QR code and NFC tag open. You can change it later, but it's easier to get it right now.
6.3 Run the Quick Setup wizard
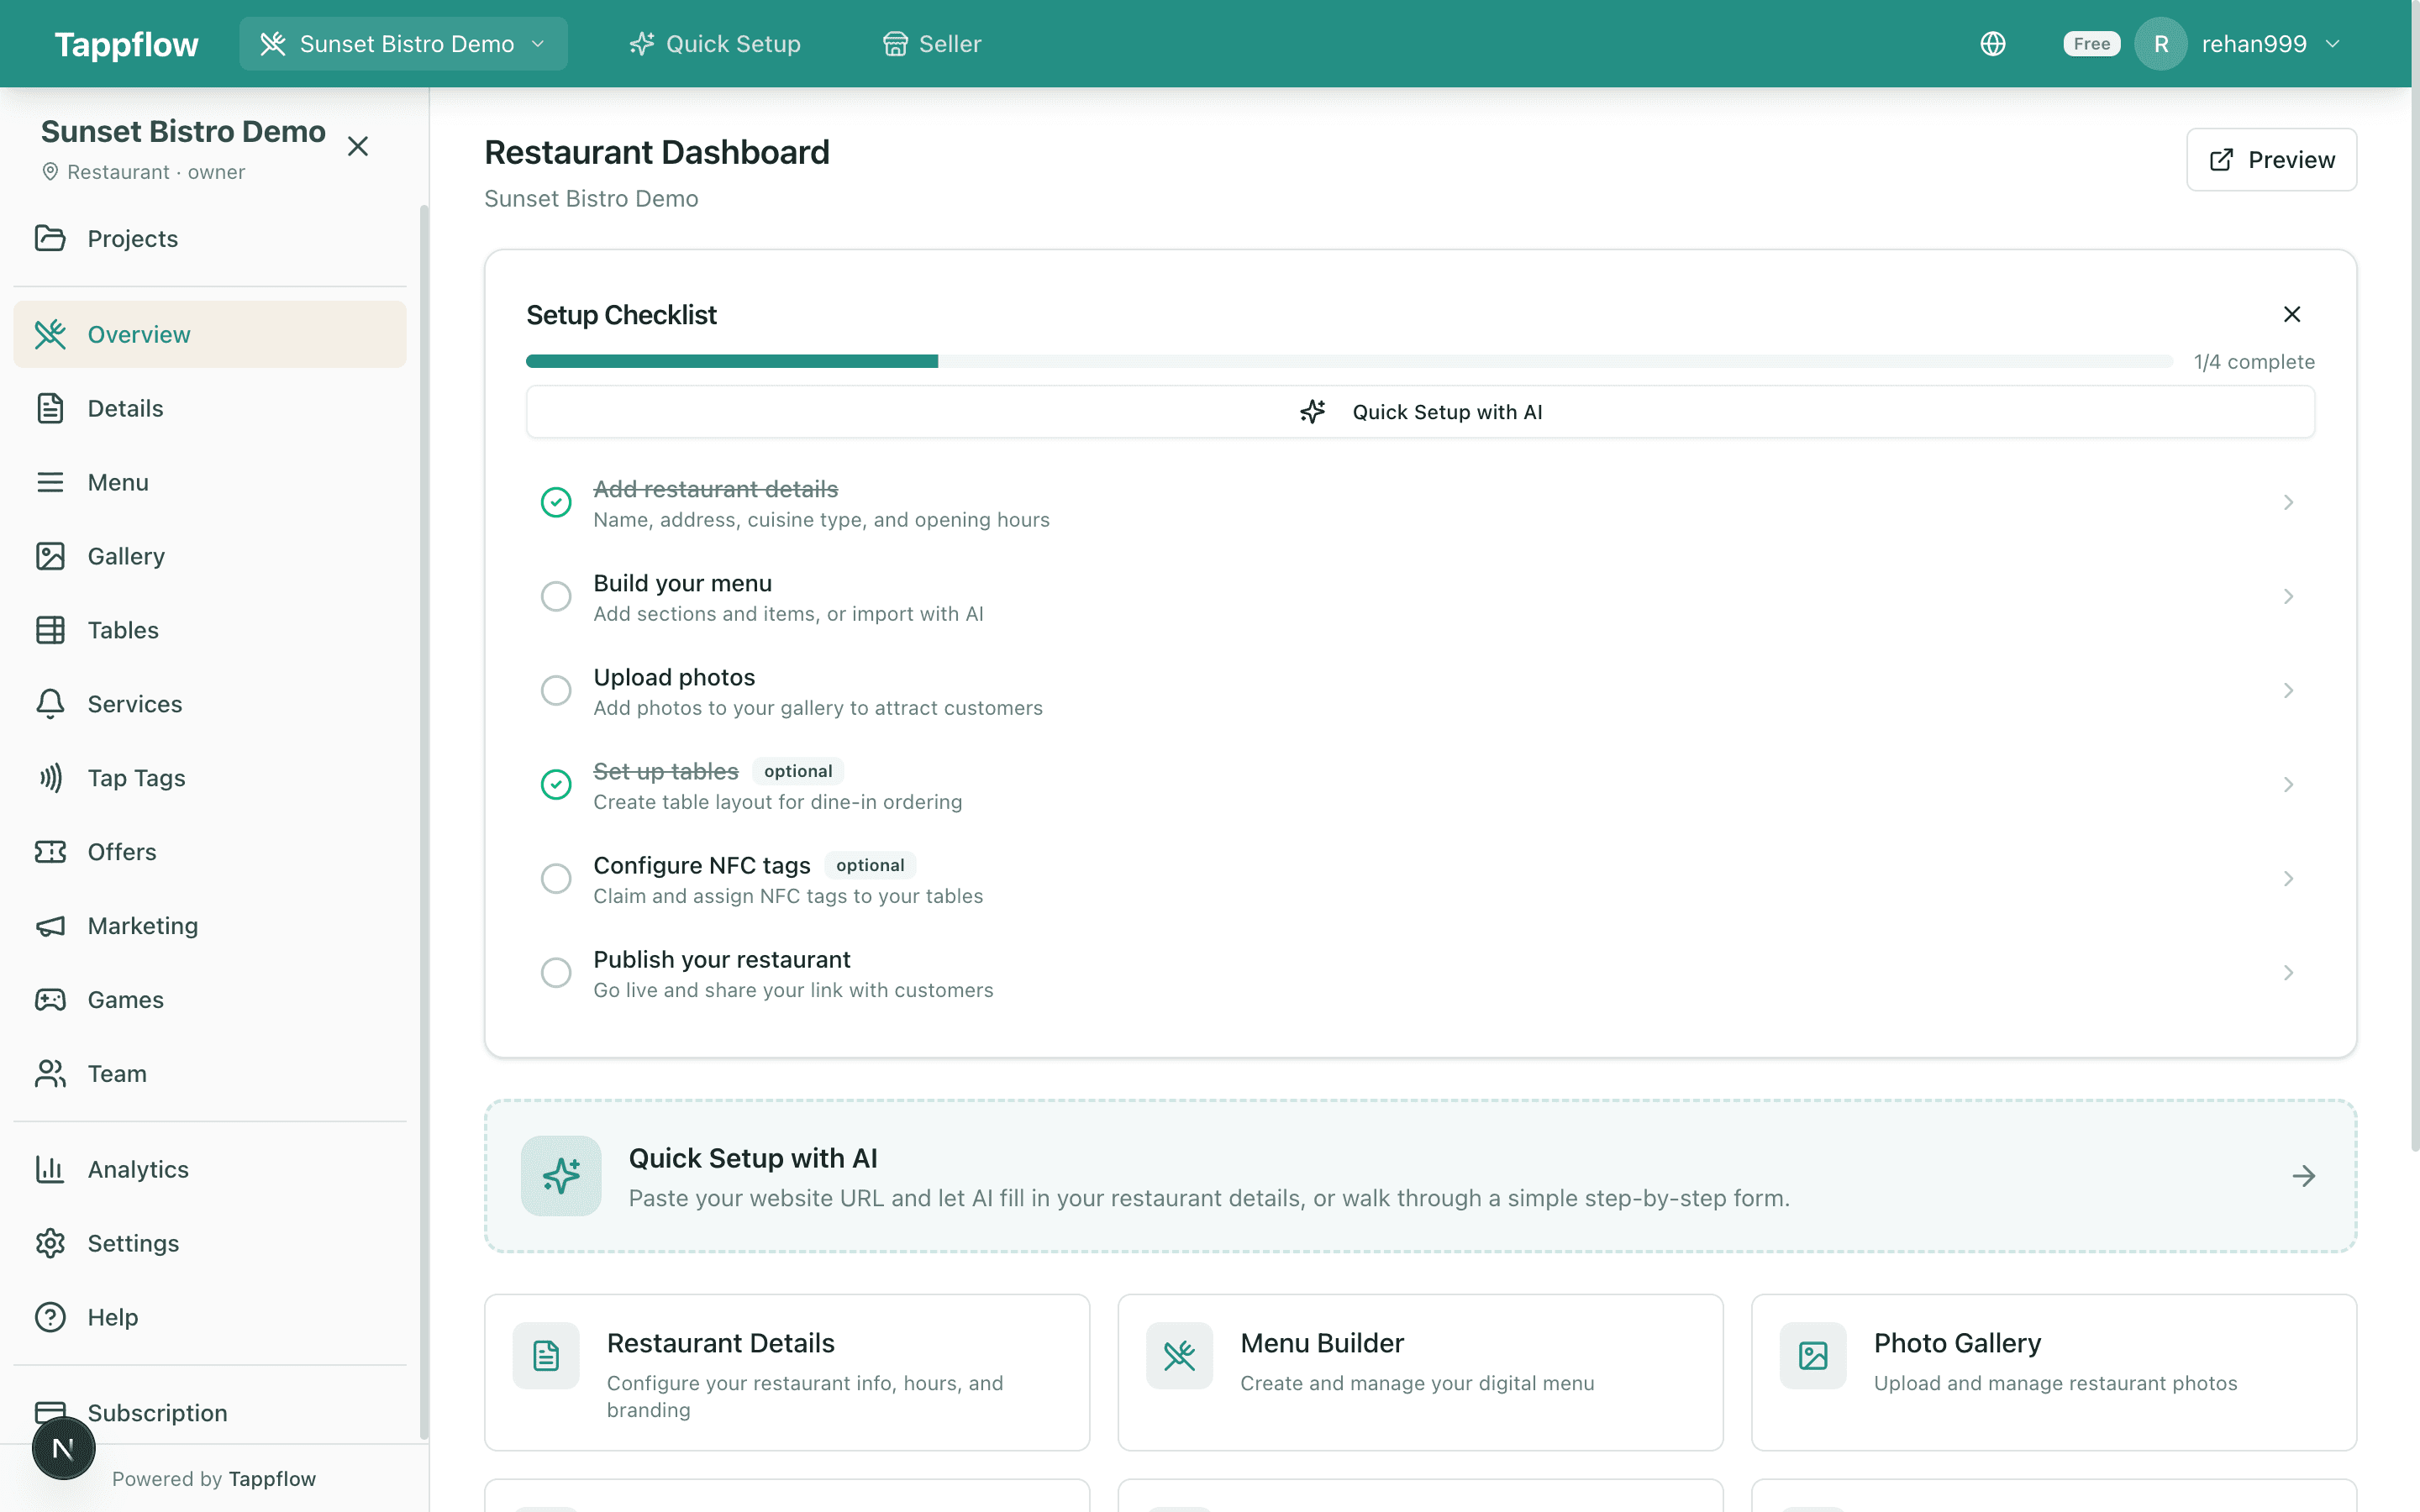
The new restaurant dashboard opens with a setup checklist — treat it as your onboarding map. Click Quick Setup to fill in the basics in a guided seven-step wizard.
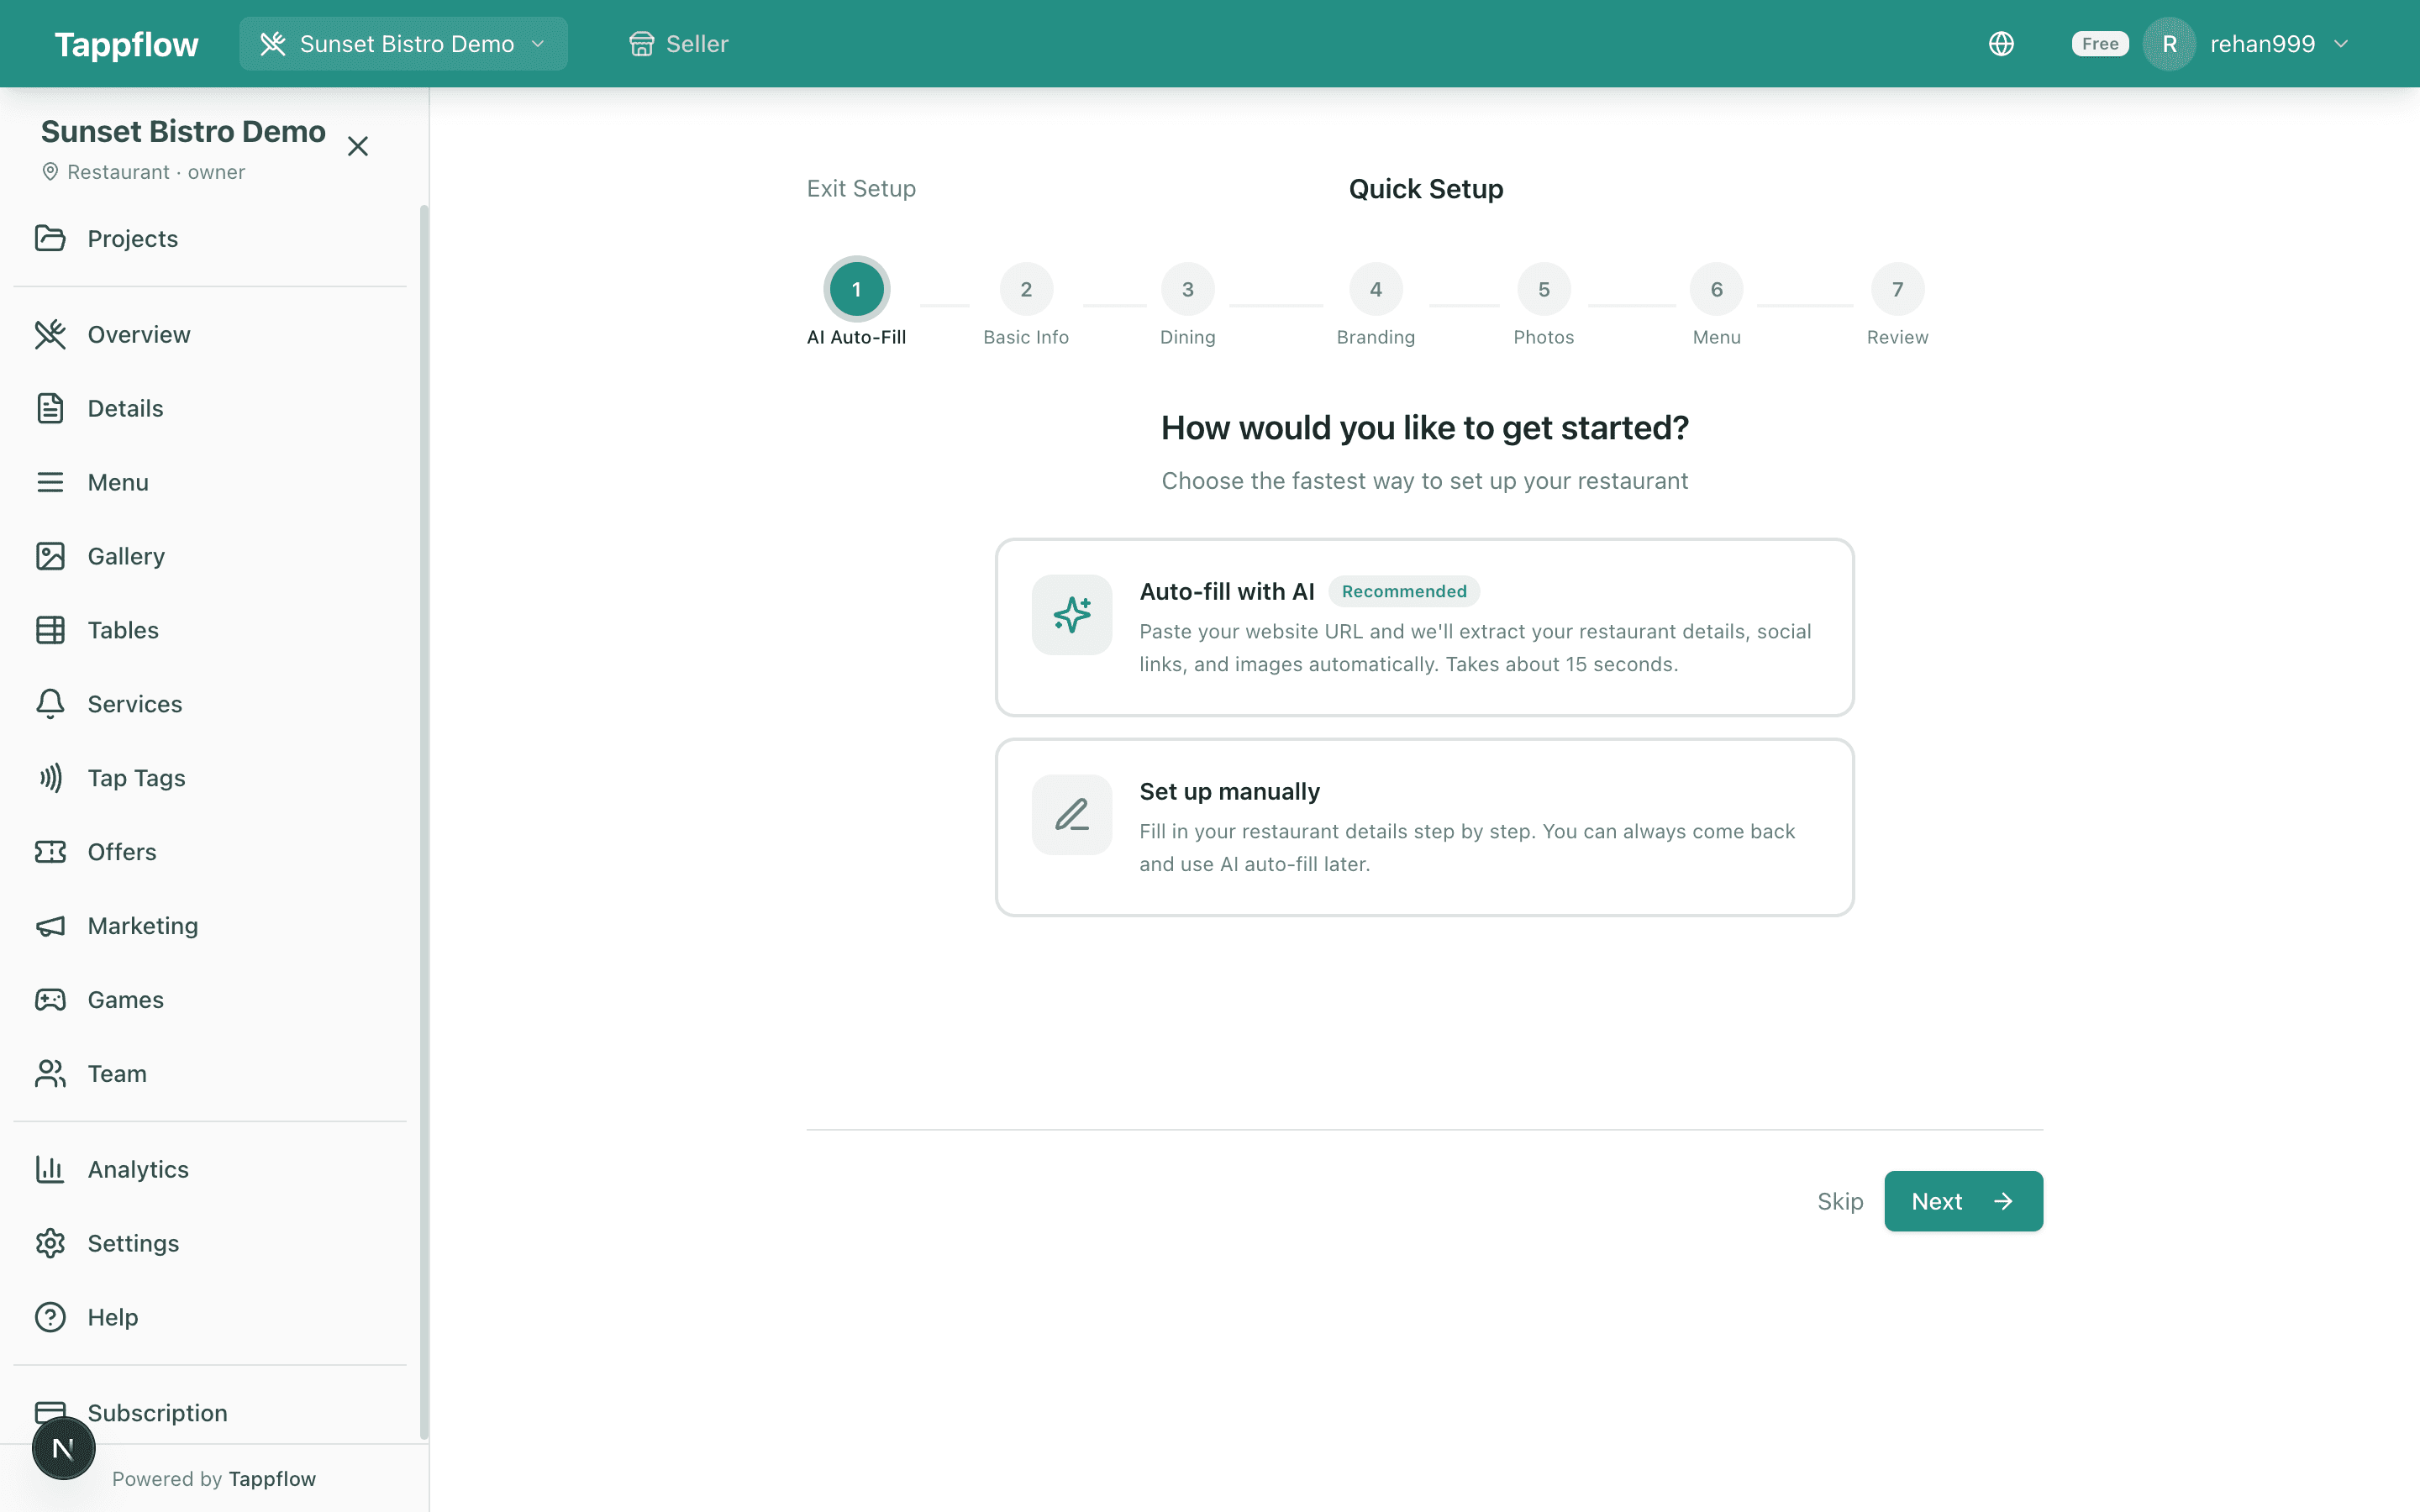
Paste your existing website URL and Tappflow scrapes your cuisine type, address, hours, phone, and a short description, prefilling the form. Review, correct anything the model got wrong, and save. No website? Skip the AI step and type in your details — it's still under two minutes.
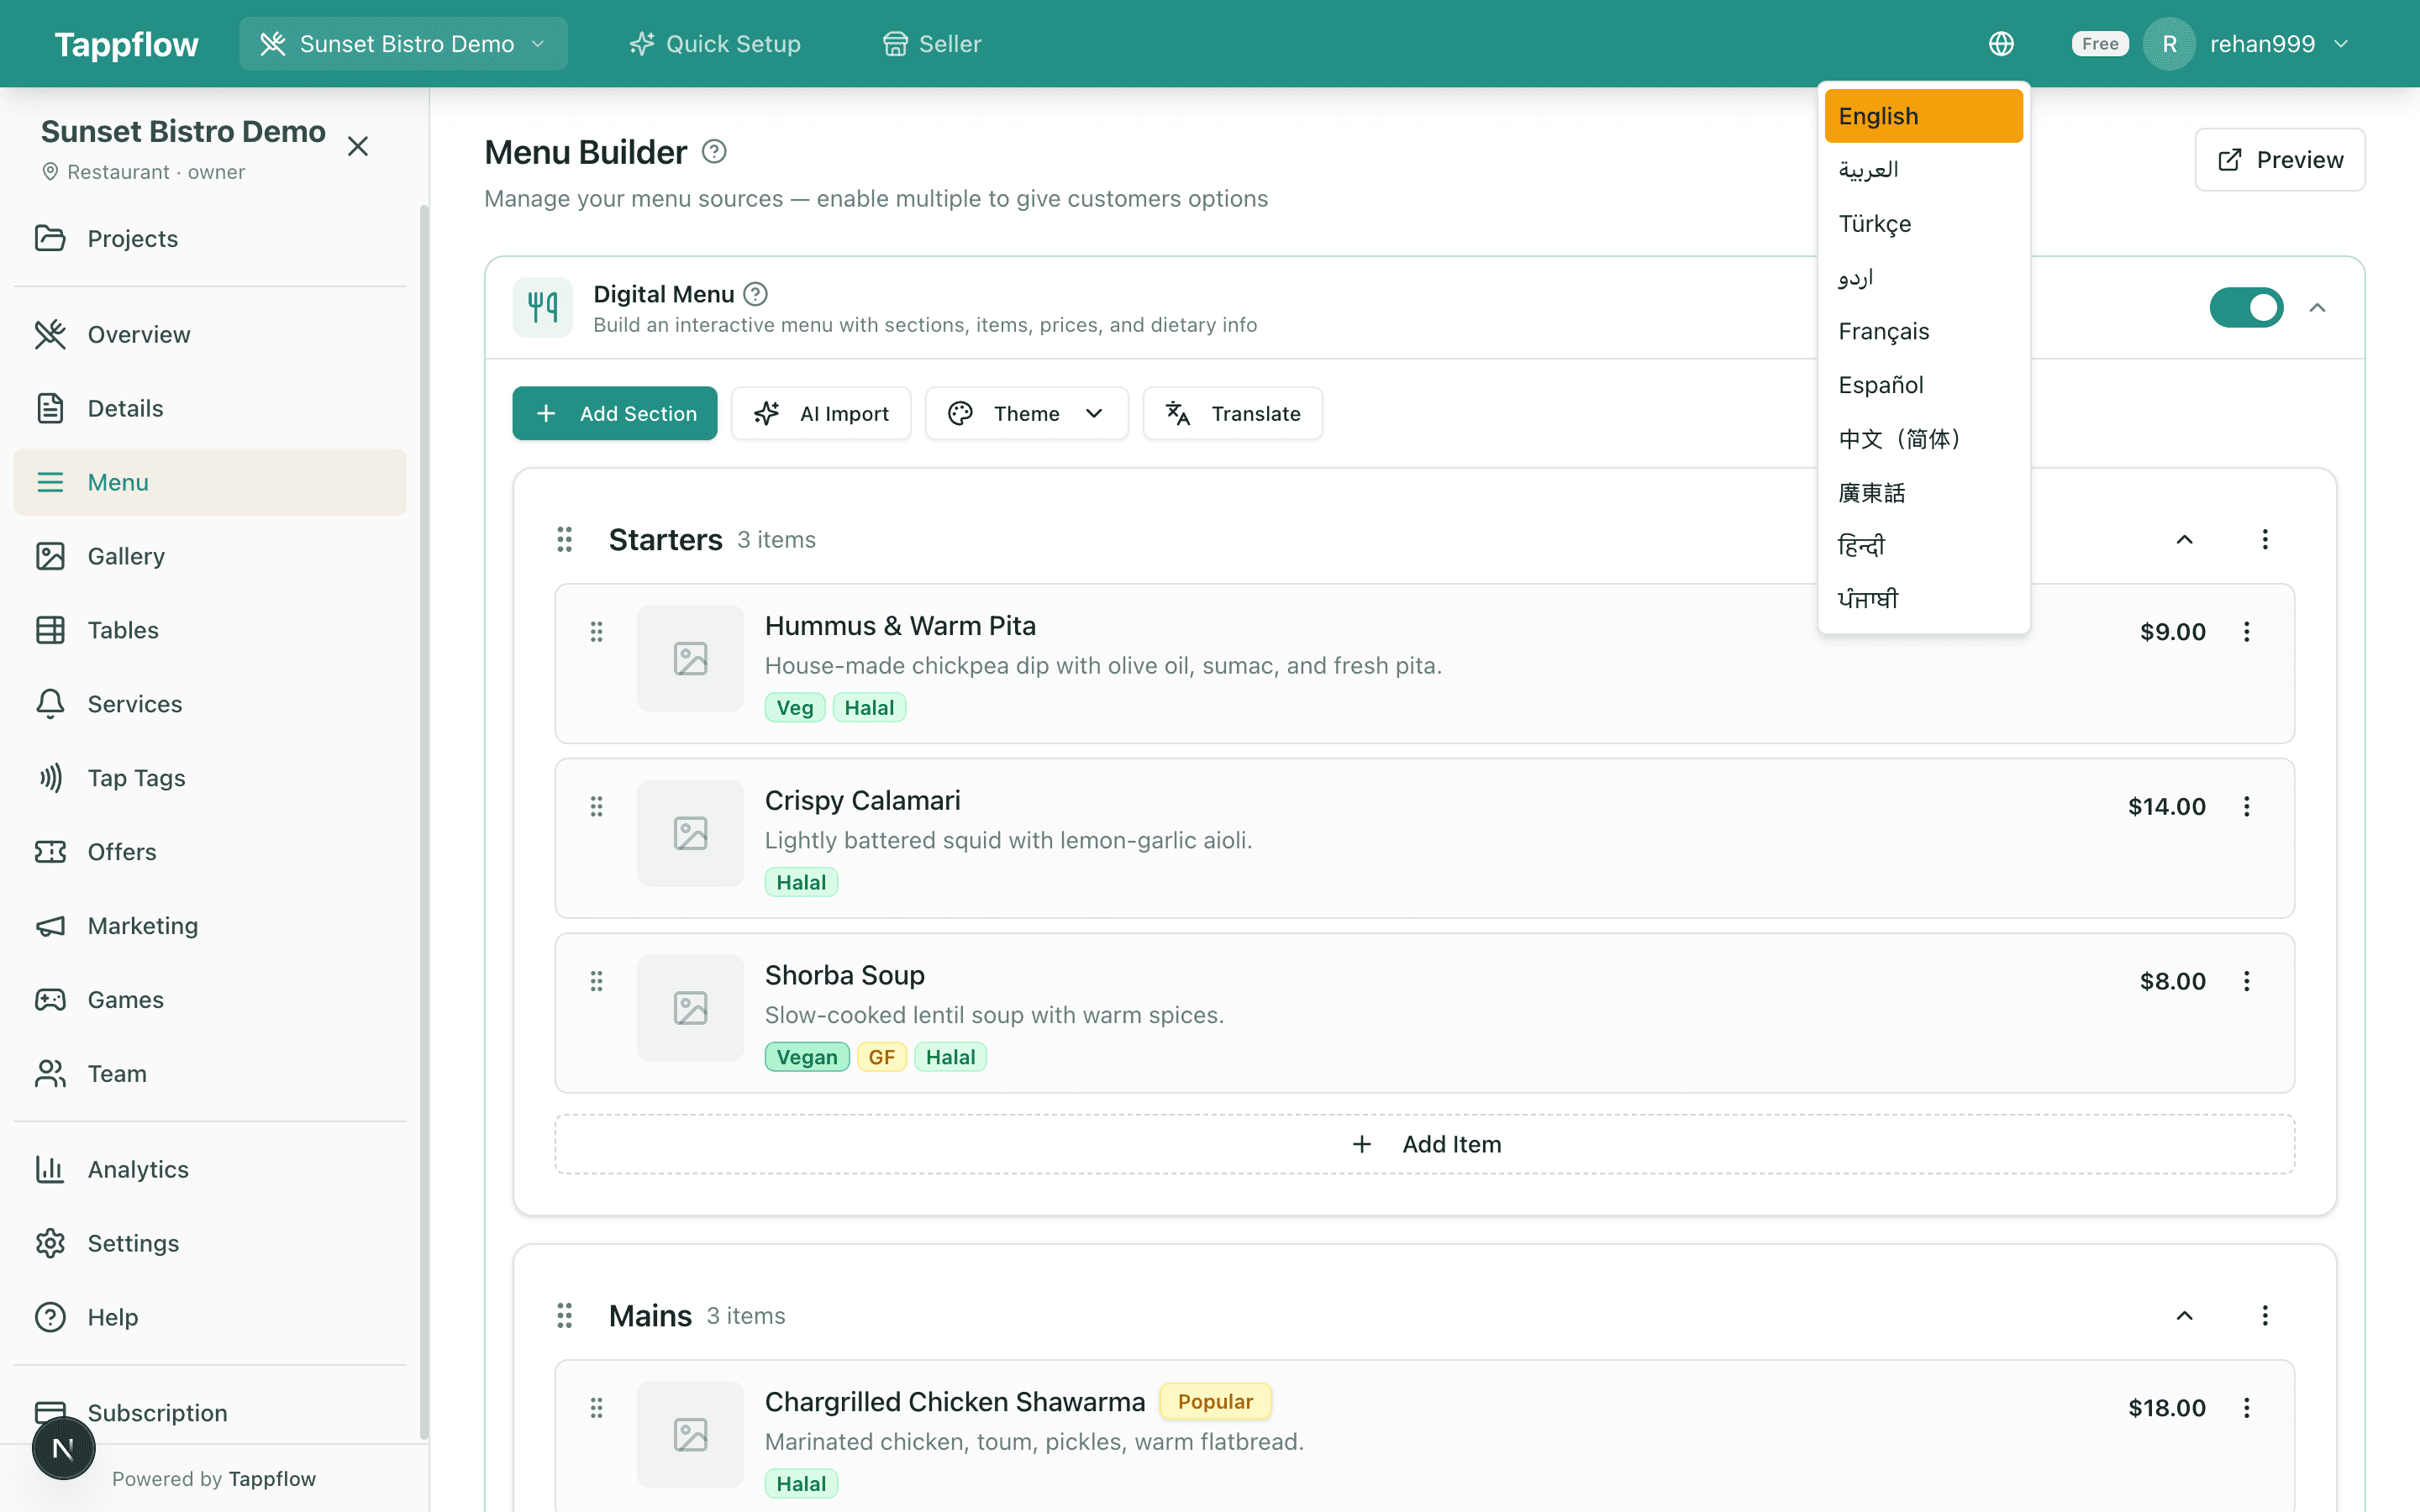
6.4 Build the menu
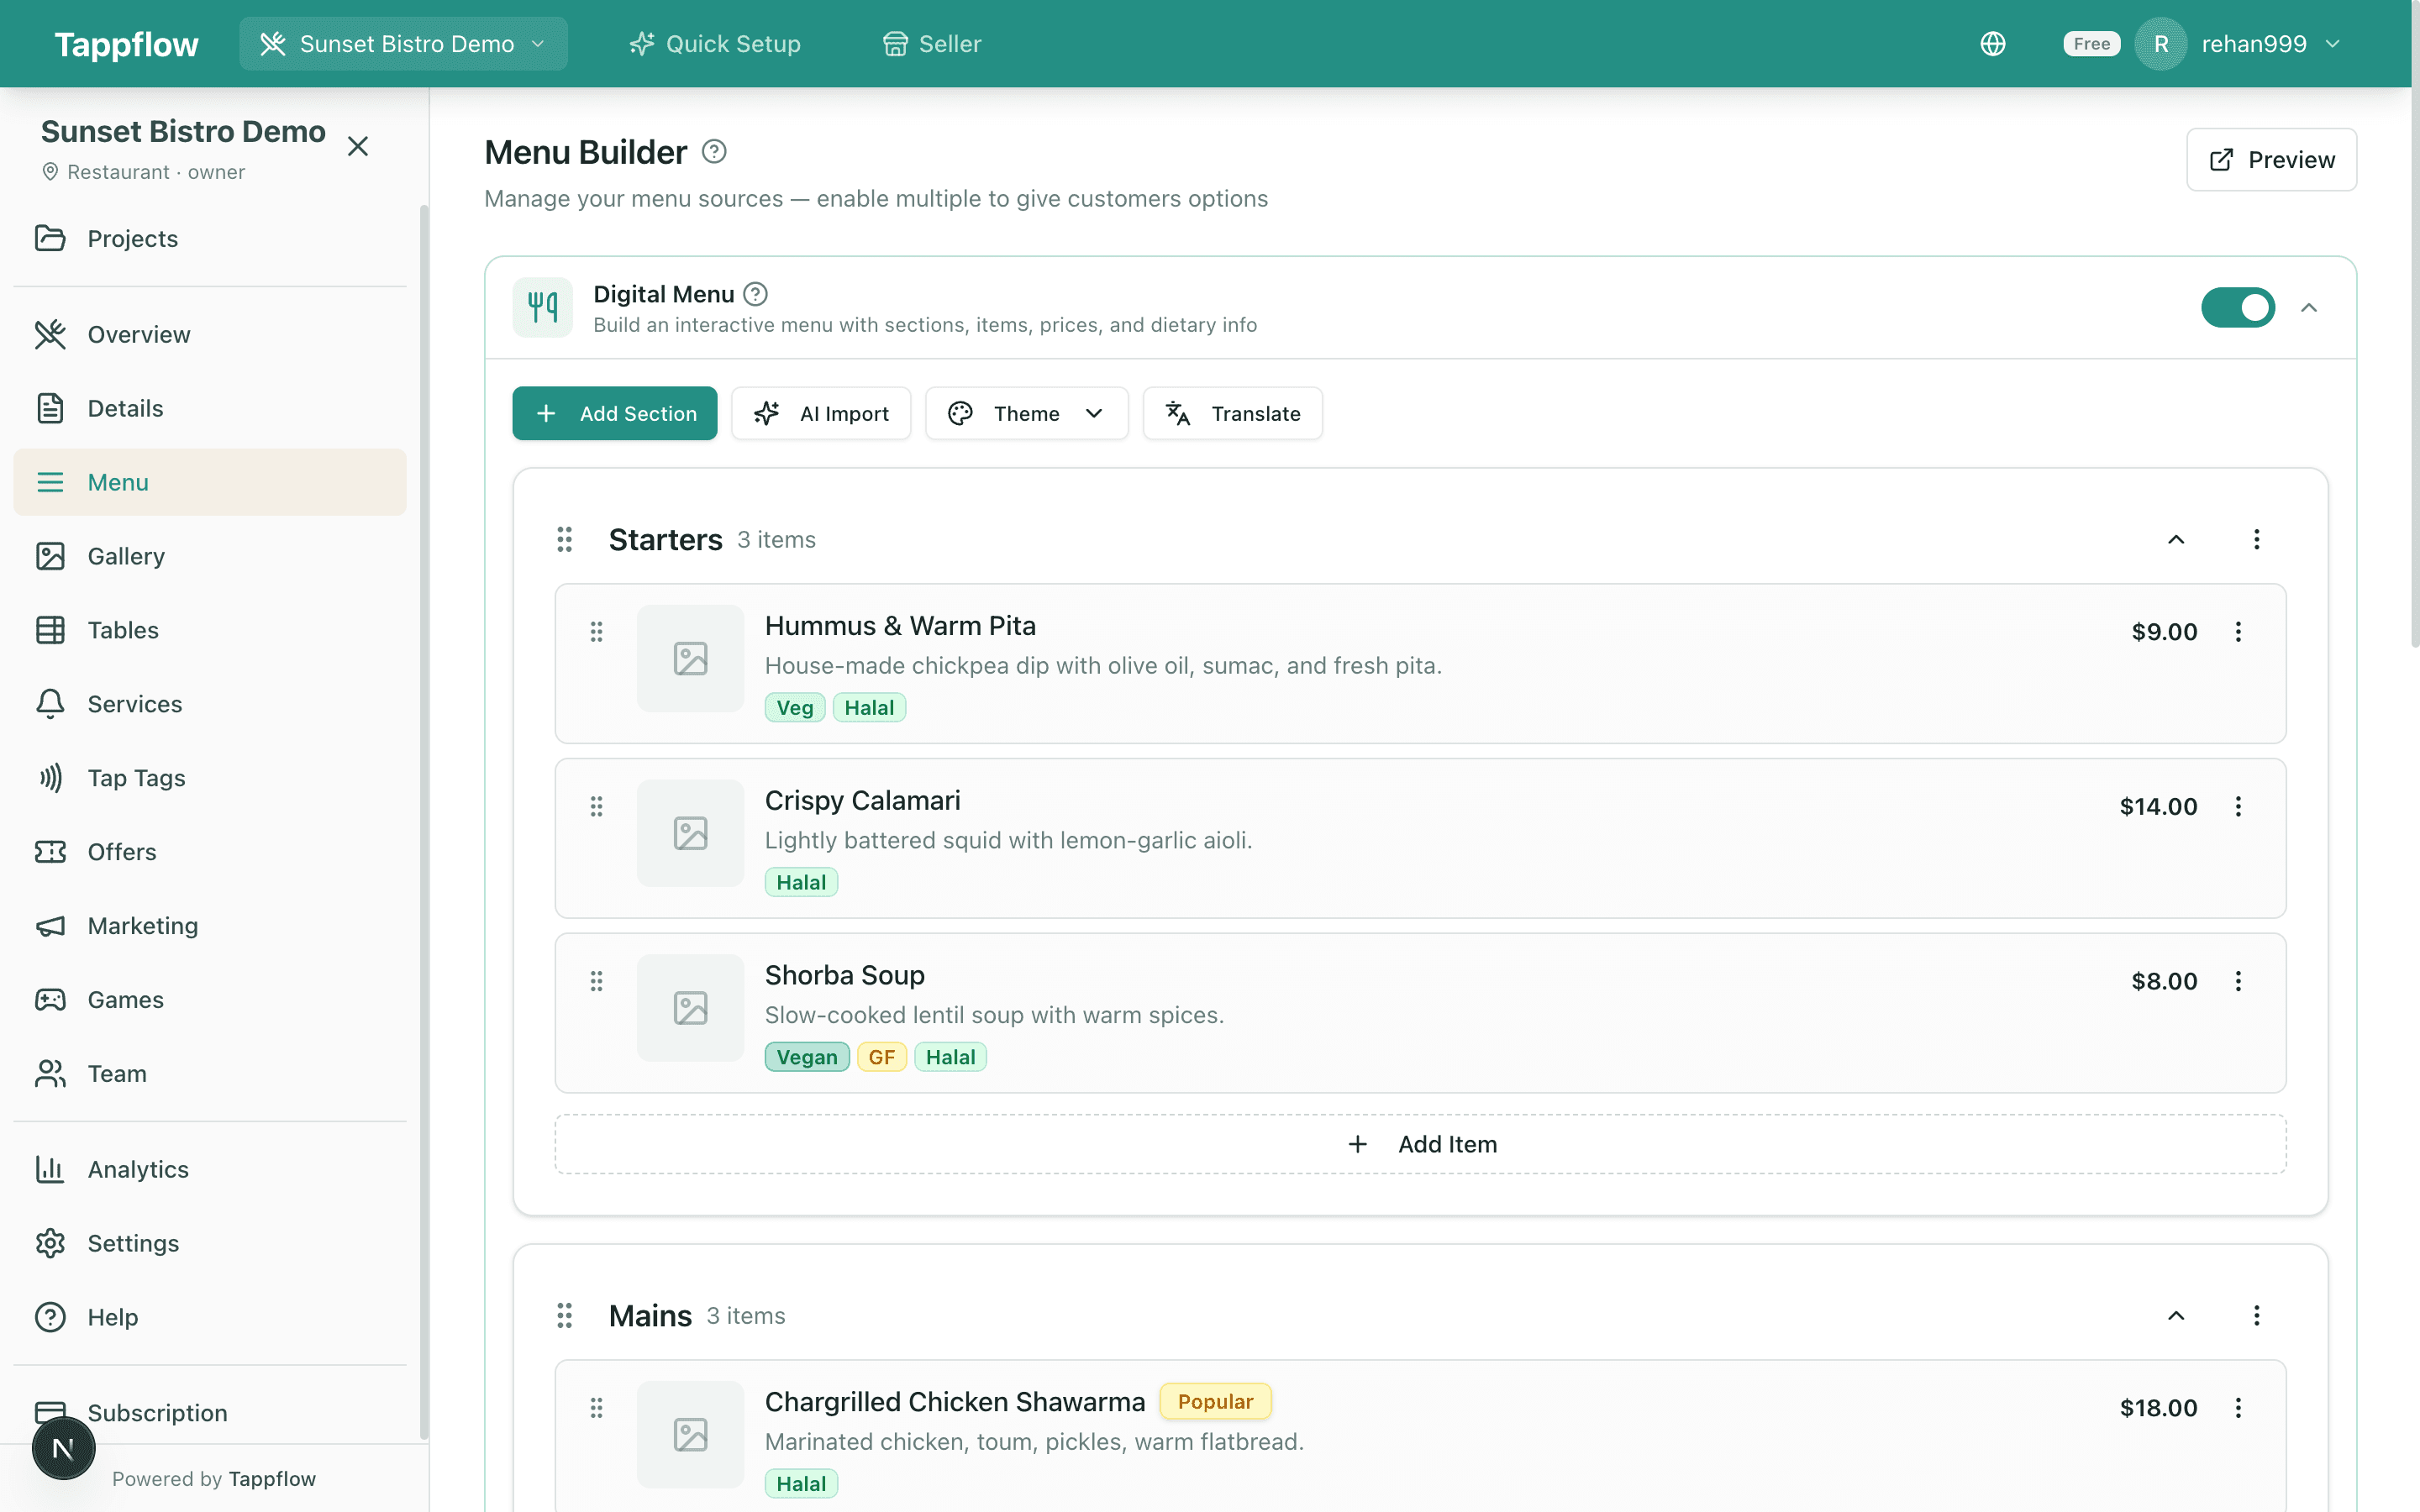
Open the Menu tab. You have three ways to build it, roughly in speed order:
- AI menu import (fastest). Upload a PDF or a clear photo of your existing paper menu. Tappflow extracts names, descriptions, and prices, and tags dishes as Halal, Vegan, or Gluten-Free where it can infer them. Review and publish — 50 items in under ten minutes.
- Manual entry. Add sections and items one by one. Drag to reorder. Slower, but gives you full control from the start.
- Embed a URL. Already have a menu page elsewhere? Drop in the URL and Tappflow embeds it as a bridge while you migrate properly.
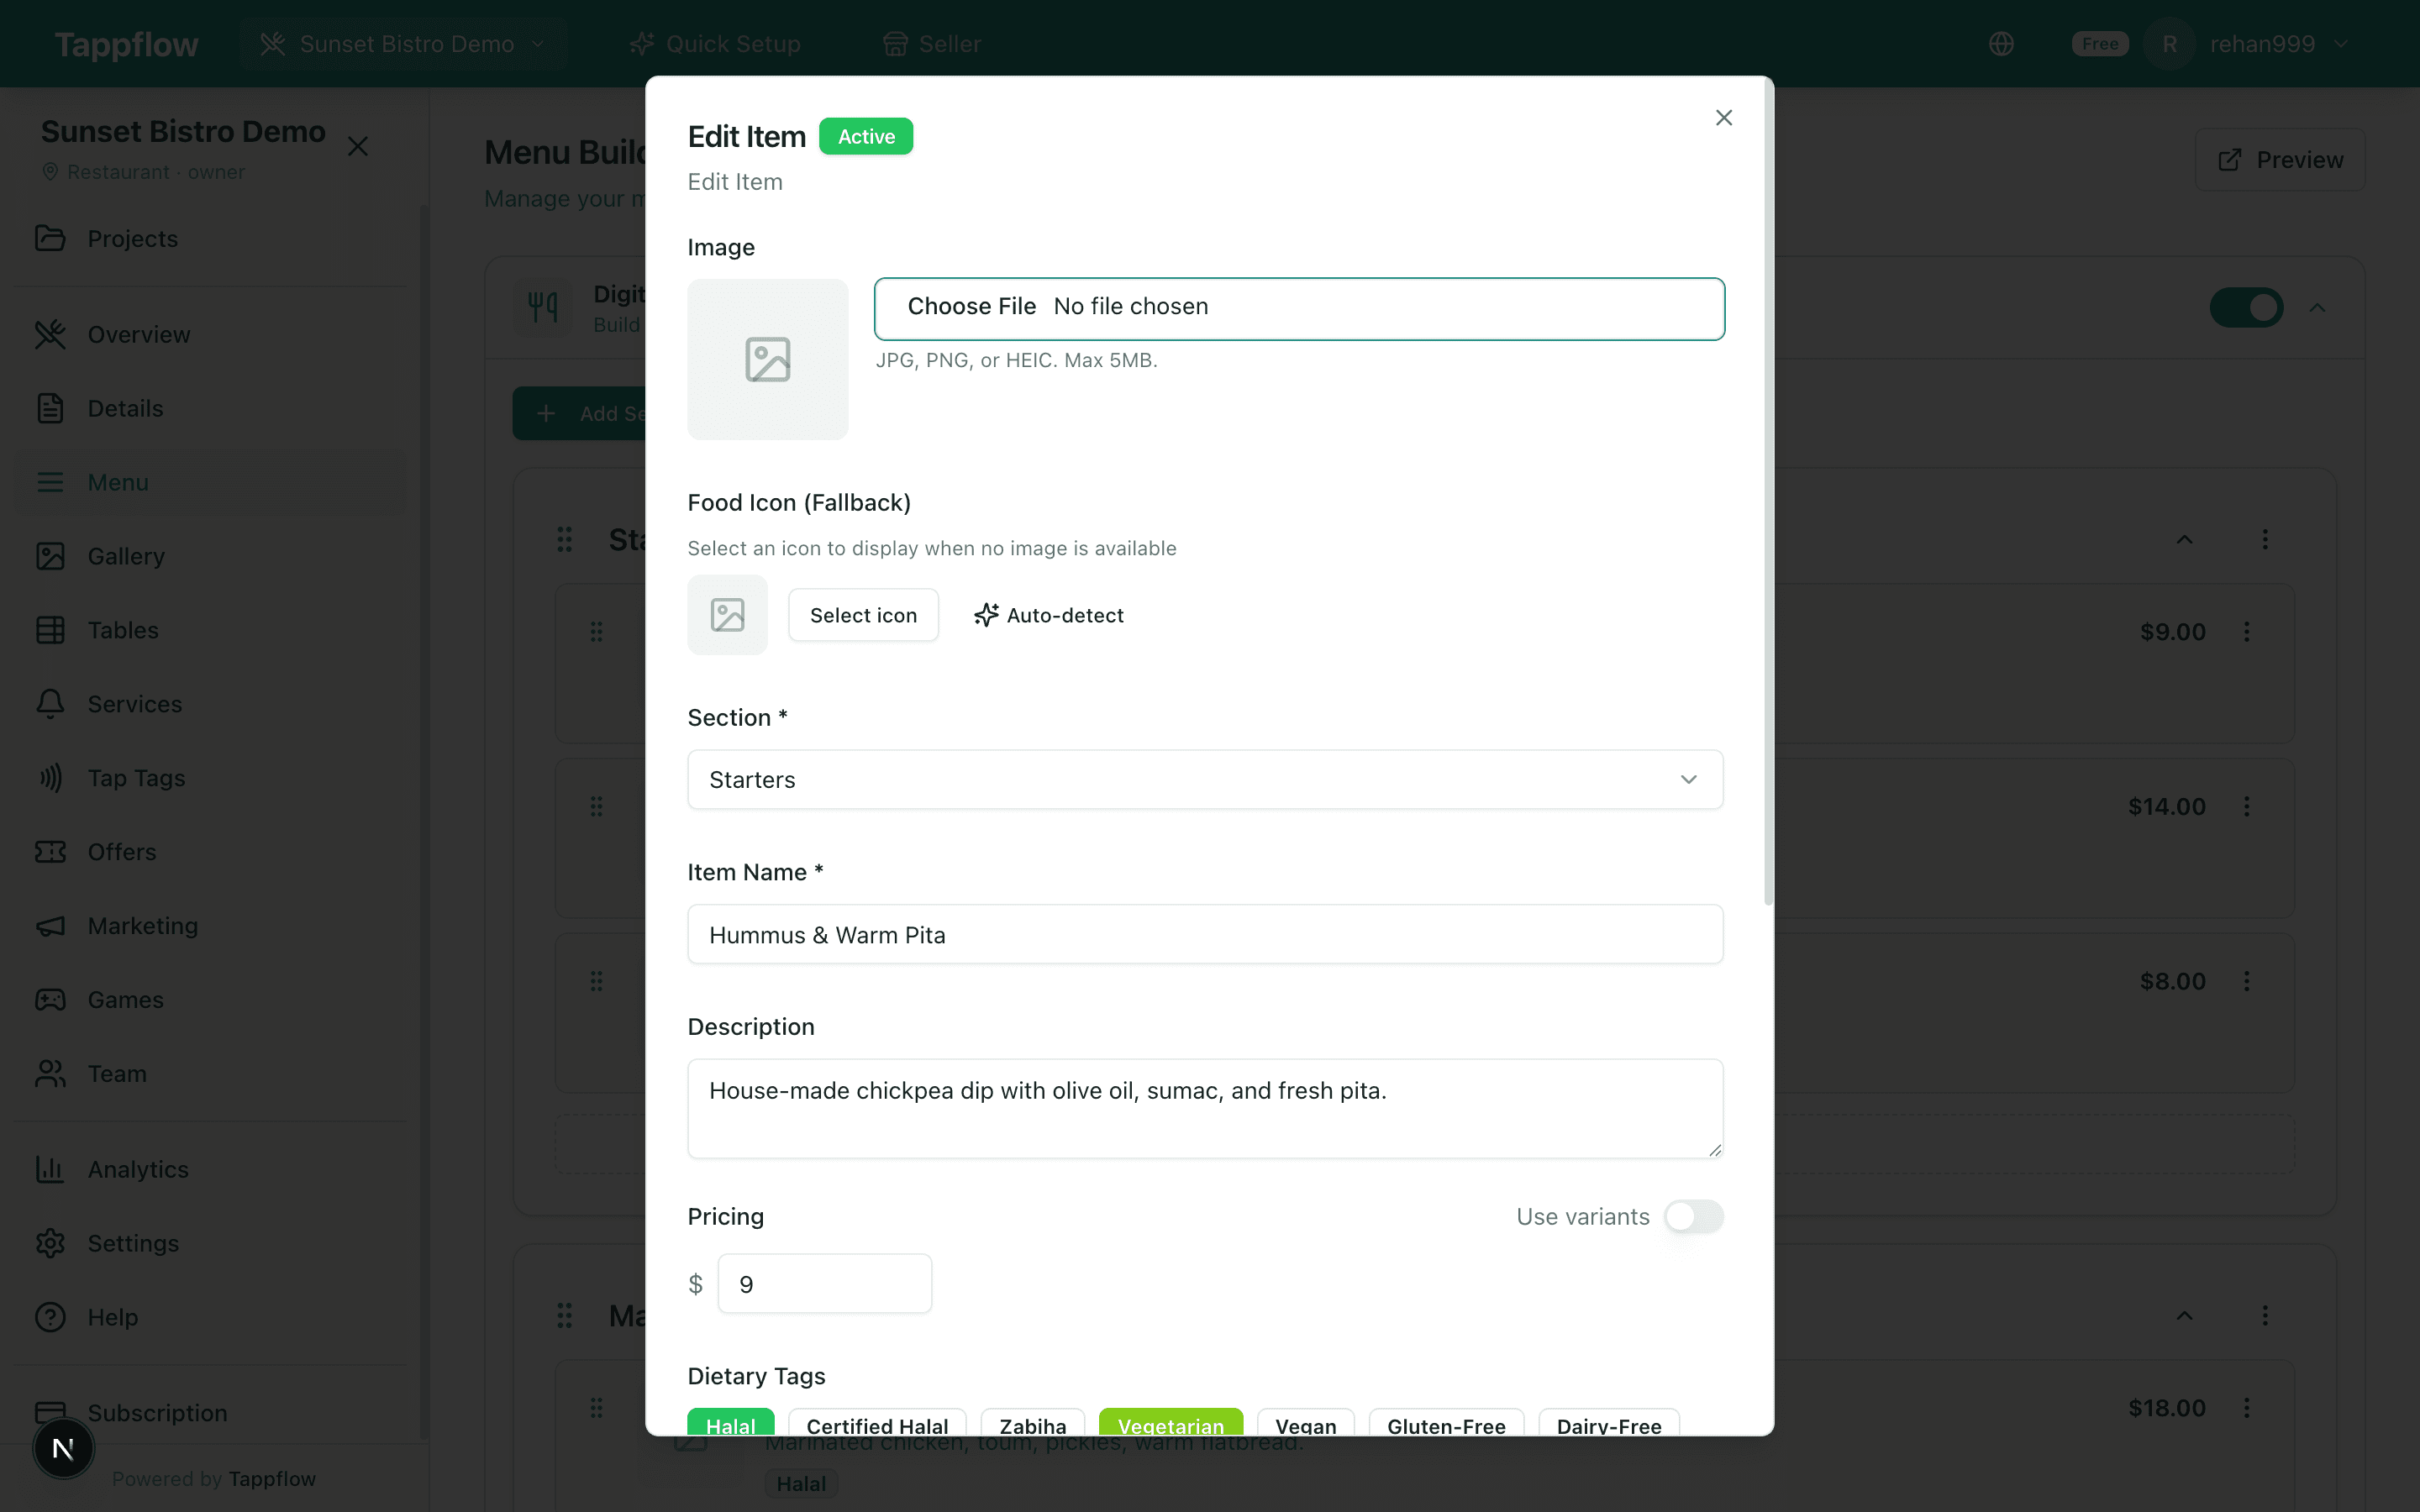
Click any item to edit it. Add a photo, mark allergens, add variants (small/large, spice levels, add-ons), set prep time, and flag items as Popular, New, or Chef's Special— all from a single panel. Take the time to write descriptions that do work; “slow-braised short rib with rosemary jus” earns orders that “beef” never will.
6.5 Map your tables
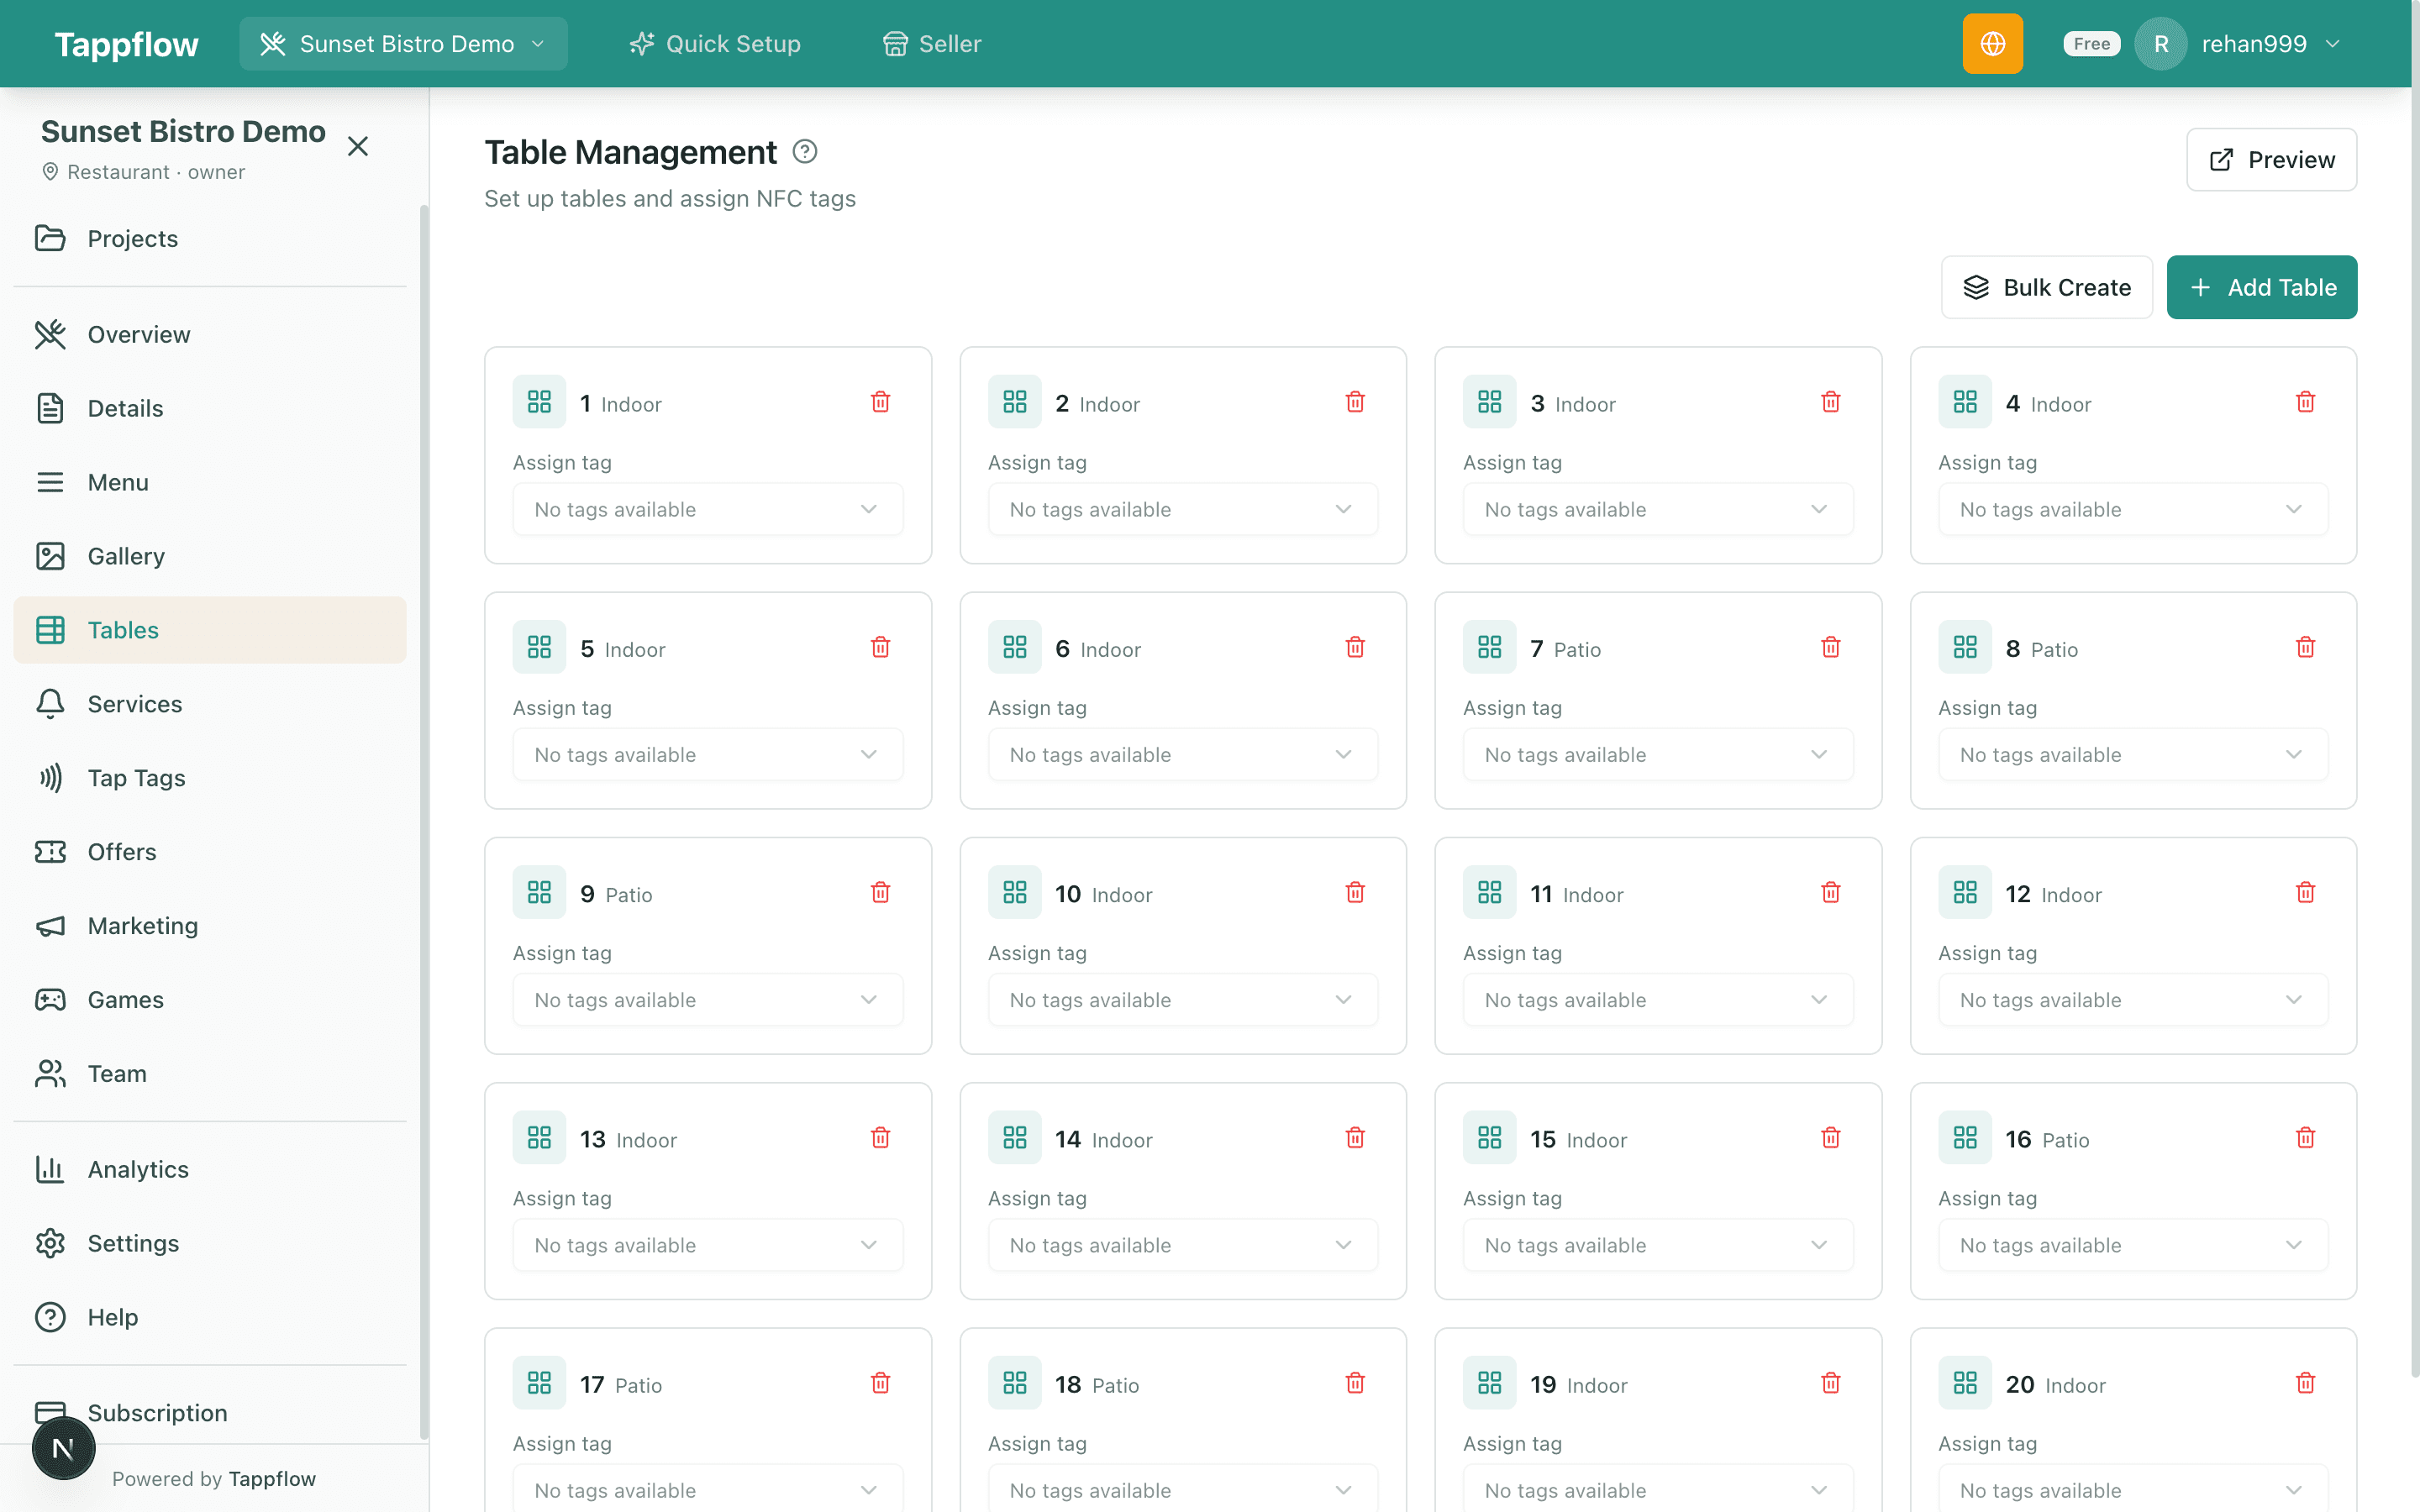
Open the Tables tab and add each table by its code — T1, T2, Patio-3 — and optionally group them into zones (Indoor, Patio, Bar). You can bulk-create tables (six indoor plus three patio in one shot) and later assign staff to zones.
Tables pull their weight in two places:
- Each table gets its own QR code, so analytics tells you which tables are busiest.
- When a guest taps a table-linked QR or NFC, they can call a server or request the bill — staff get a push notification mapped to the exact table. Less shouting across the room.
6.6 Generate QR codes and program NFC tags
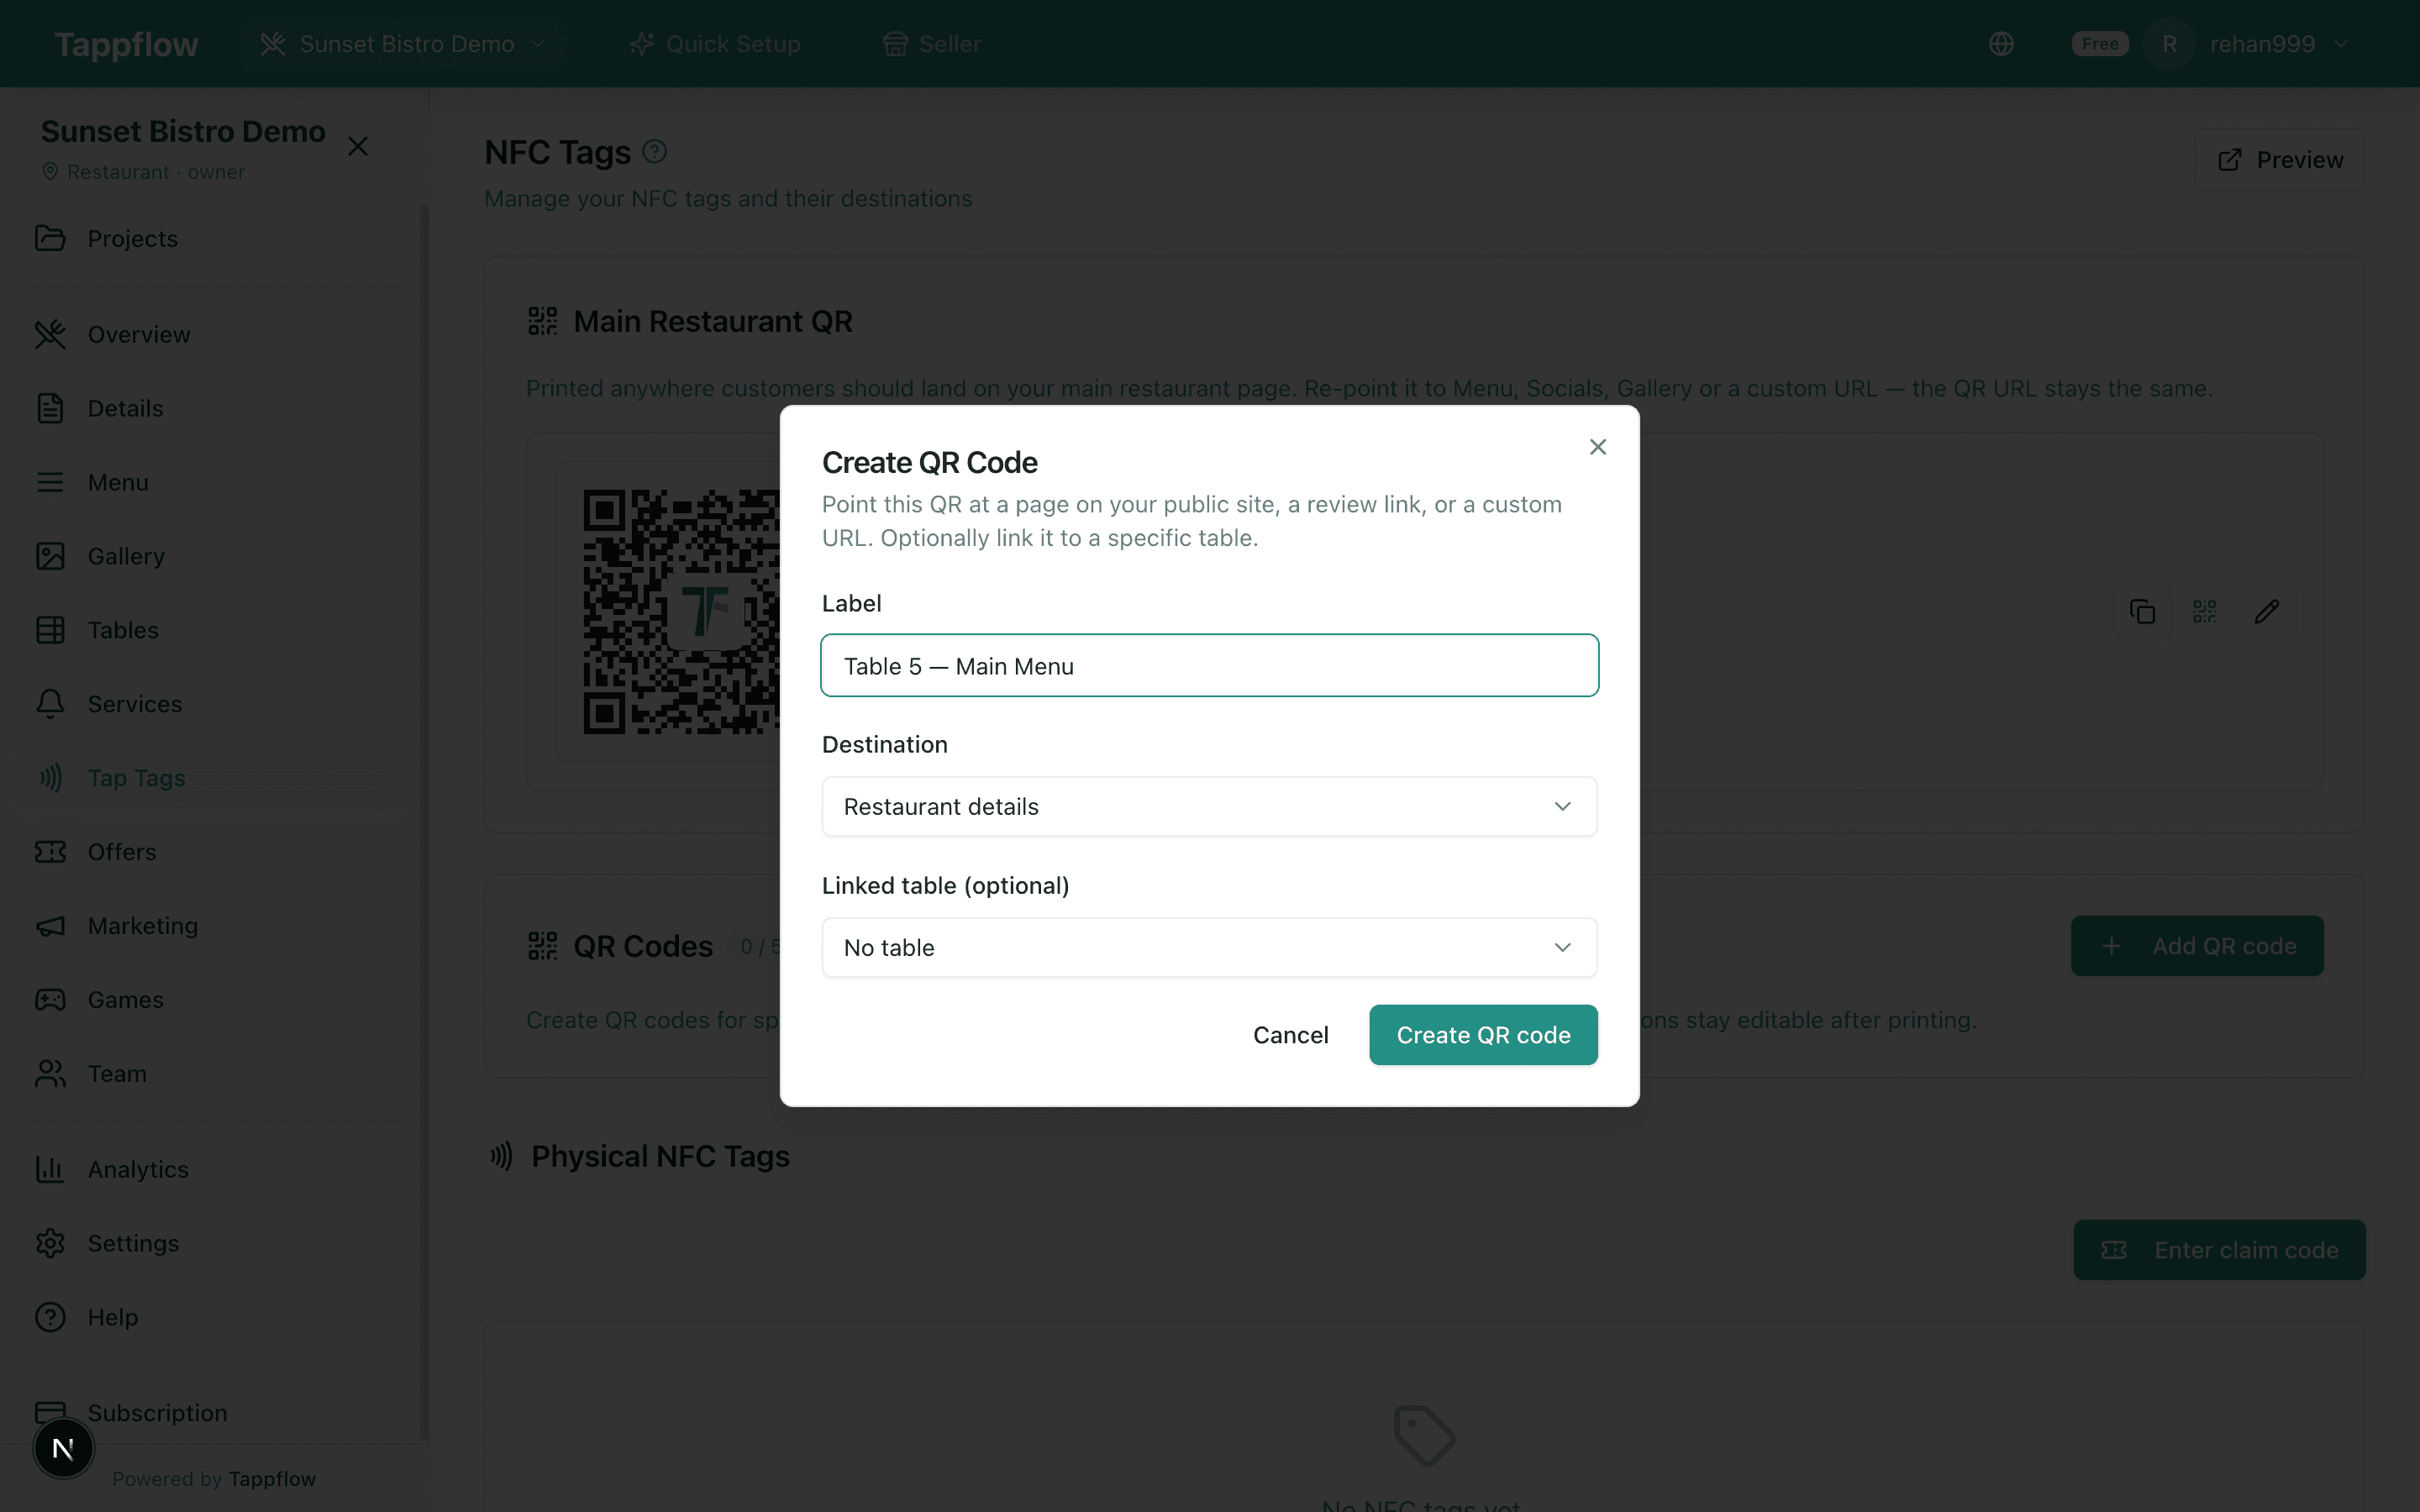
Open the QR tab and click Create QR Code. Each code (and optional NFC tag) has a destination:
- Digital menu — opens your published menu.
- Restaurant details — hours, address, phone, social links.
- Review link — sends the guest to Google Reviews or Yelp.
- Custom URL — anywhere you want (loyalty signup, feedback form, reservation page).
Give the code a label (e.g., Table 5 Menu), link it to a specific table if you want table-level analytics, and Tappflow generates a print-ready QR plus an NFC tag URL. Print the QR on table tents, menus, or receipts; stick an NFC sticker under the tabletop for tap-to-view access. Most full-service venues ship both.
6.7 What guests see
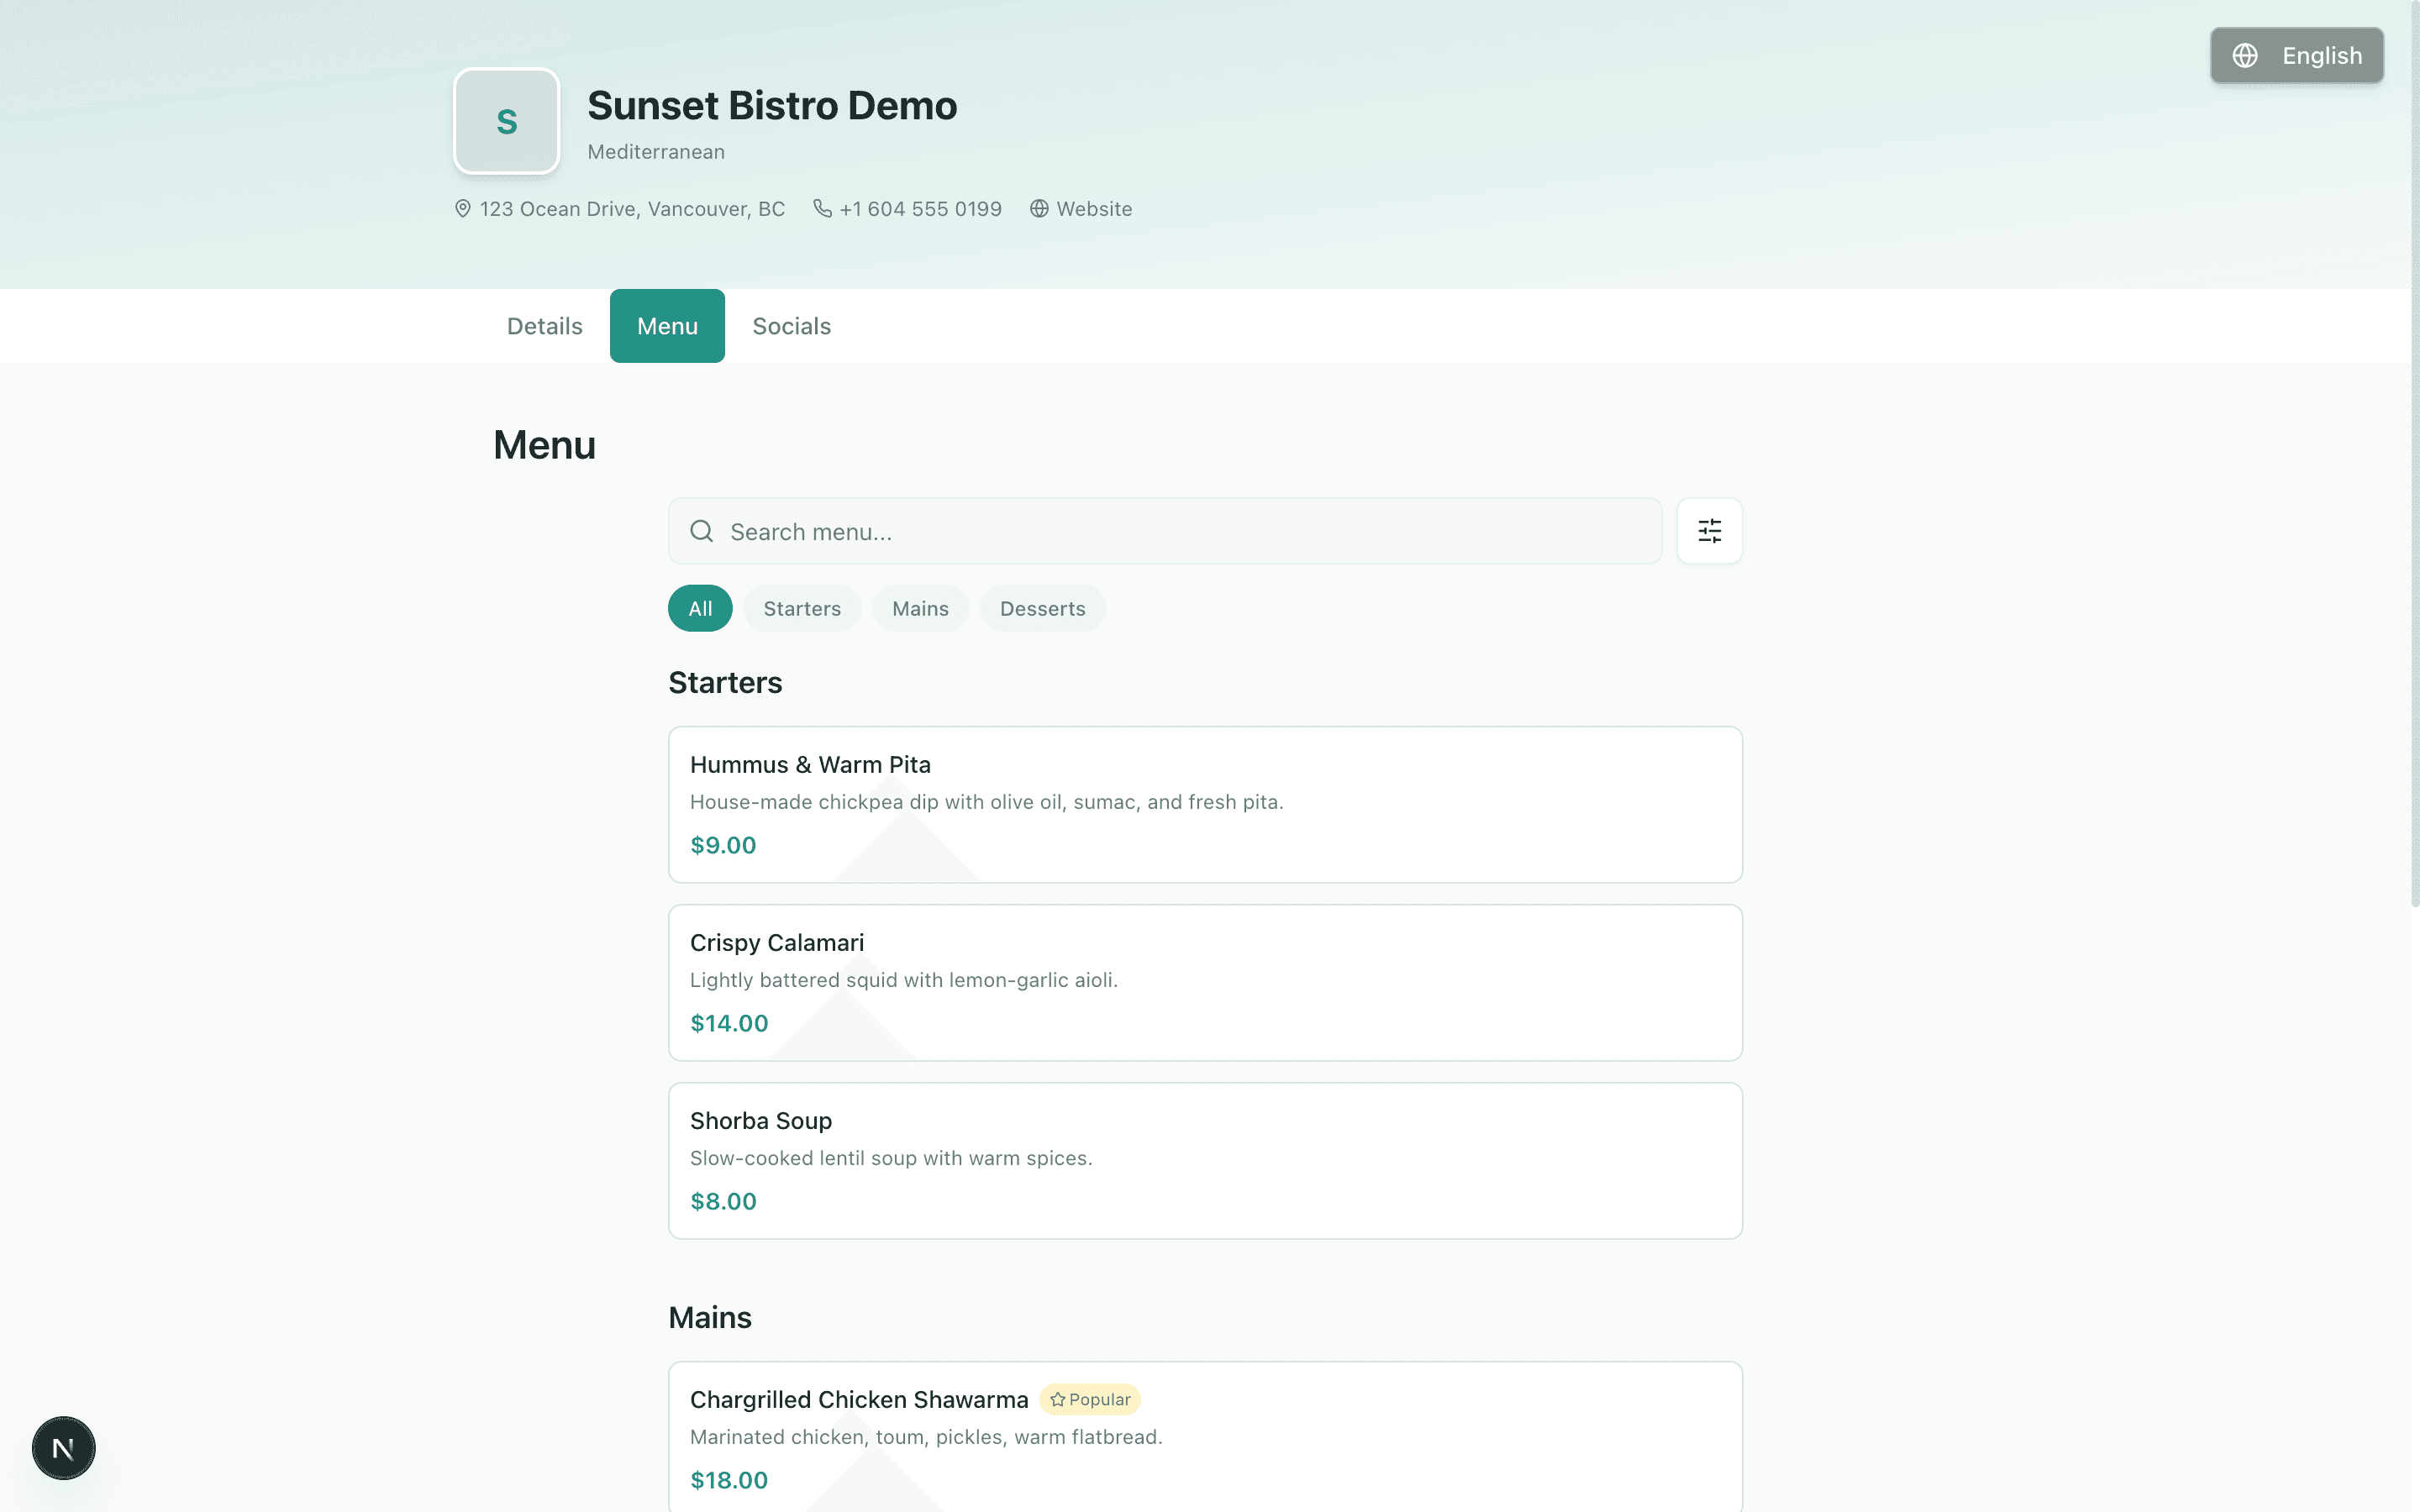
Your live menu lives at tappflow.app/q/your-restaurant-slug. When a guest scans the QR code or taps the NFC sticker:
- They land on your branded restaurant page in under two seconds.
- They see the menu, gallery, dining info, and contact details — in their phone's language.
- They can request service, filter by dietary tags, or view specials.
- No app, no signup, no friction.
The public page is mobile-optimised and indexed by Google, which means your online menu starts doing double-duty as local-SEO content. Restaurants with structured menu pages rank better for searches like “best halal food near me” or “vegan restaurant downtown” because Google can actually read the menu.
6.8 Read the analytics
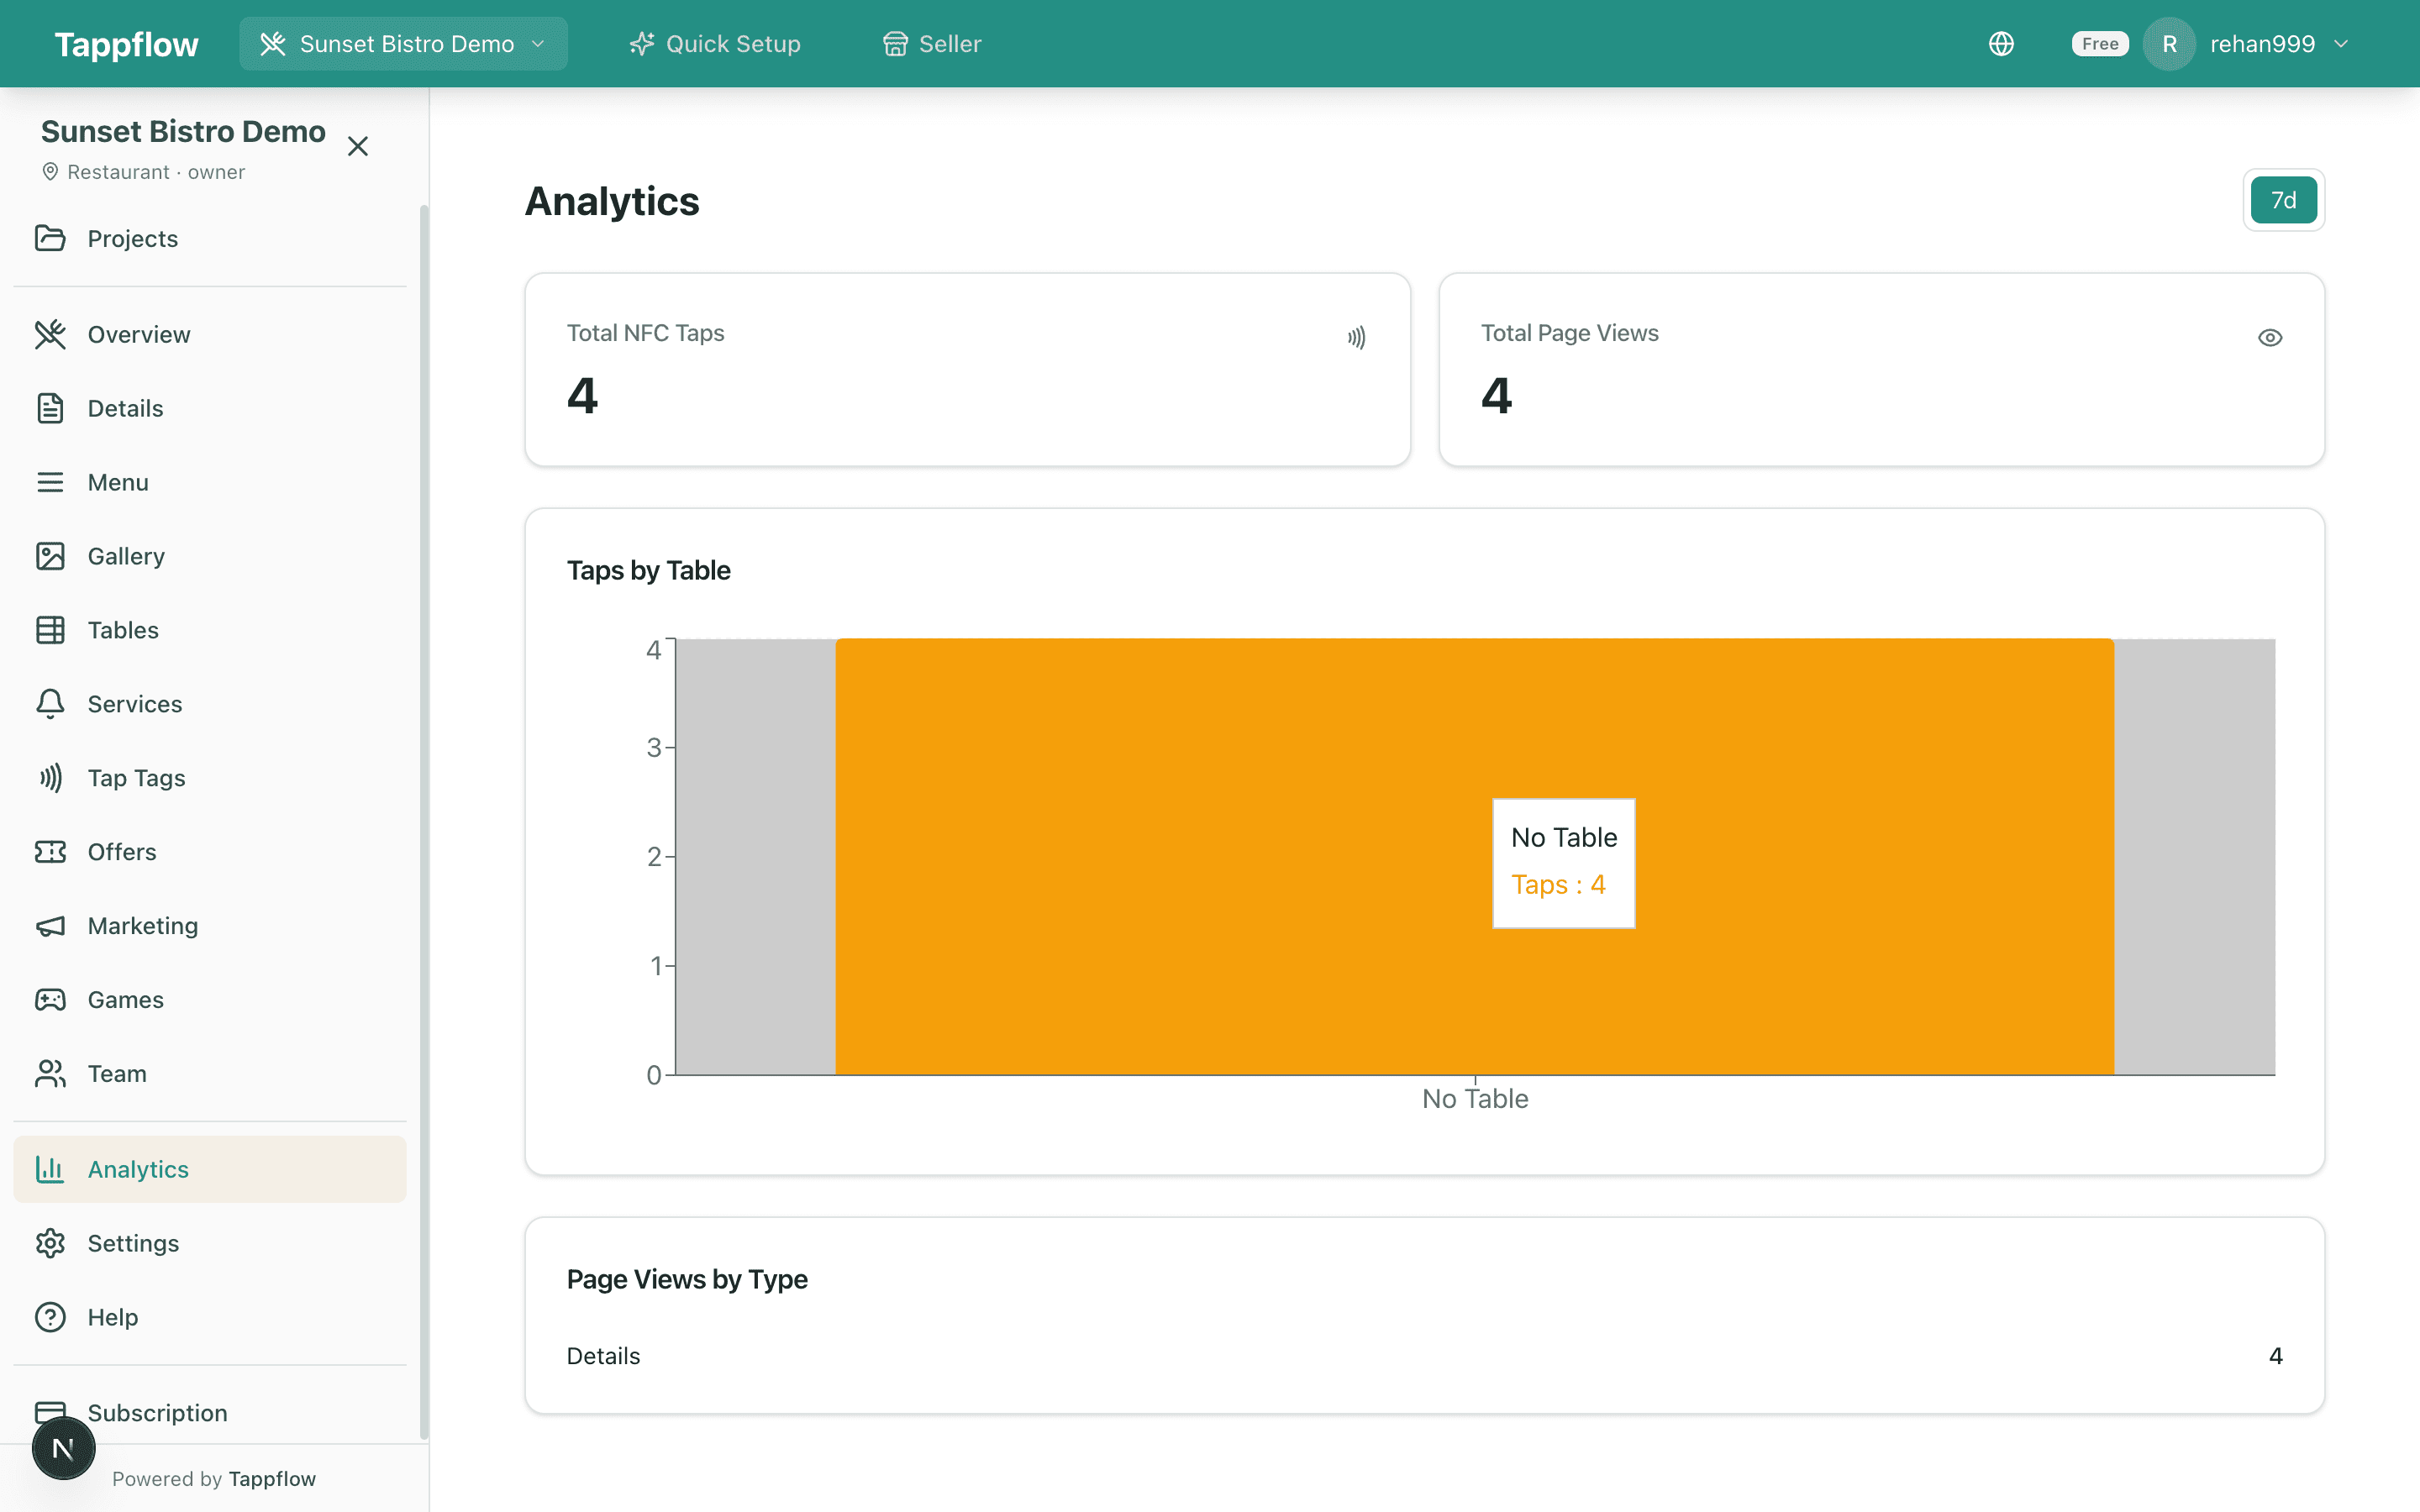
Every scan, every menu item view, every service request is tracked. The Analytics tab surfaces:
- Which items get viewed most (and which get nothing).
- Which tables are busiest, and when.
- Which languages your guests read — useful for deciding what to train staff on.
- Scan-to-order and scan-to-review conversion.
Use this to adjust your mix, reprice slow sellers, and double down on what's working. You don't get any of this from print.
That's the whole build — want to try it?
Every screen above is on the free plan. No credit card, no app install, unlimited menu items. Drop in your existing menu PDF and you'll be live in under ten minutes.
Step 7: Set up ordering or lead capture (optional)
A digital menu alone is already a win. But the same page can do more:
- Ordering. Takeout and QSR venues benefit most. Full-service venues should think twice — it can erode the server relationship.
- Waitlist signup. High-value if you have lines on weekends.
- Loyalty / SMS. One opt-in checkbox. Don't make it mandatory.
- Google review prompt. After payment, not before. Timing matters.
The pattern that works: keep the core menu experience fast and app-less, then offer one optional action at the end. If you overload the entry, scan-to-view rates drop.
Step 8: Launch, test, iterate
Don't roll out to every table on day one. Pick one shift, put the QR or NFC at three tables, and watch what happens. You'll notice things no dashboard can tell you:
- 1
Pick your soft-launch tables
Two to four tables near the host stand so staff can observe without being obvious.
- 2
Watch three shifts
Lunch, dinner, and a weekend. Adoption varies by daypart more than most owners expect.
- 3
Ask staff for feedback
“What did guests ask you about the menu?” is the best debug question you can ask.
- 4
Read the analytics
Taps per table, top-viewed items, drop-off. Look for surprises — especially items nobody is looking at.
- 5
Roll out to the rest
Once soft-launch numbers look healthy, deploy to every table and retire the test.
Common mistakes to avoid
- Uploading a PDF and calling it done. It's not. PDFs don't update, don't load fast, don't track.
- Hiding the QR / tag. If guests can't see it within three seconds of sitting down, they won't use it.
- Forcing an app install. Every app install screen cuts adoption roughly in half.
- No fallback. Phones die, NFC fails, QR cameras get picky. A short typeable URL rescues edge cases.
- Leaving specials stale. The biggest win of a digital menu is instant updates. Use them.
- Paying before you've proven it. If a platform hides behind a credit-card wall, pick one with a real free tier so you can test it with your own guests before you commit.
Note
Keep a small stack of printed menus behind the host stand for guests who prefer paper, guests with dead phones, and the occasional power outage. Digital-first is not digital-only.
Free plan — no credit card
Build your digital menu in the next 10 minutes
QR codes, NFC tags, 44+ language translations, dietary tags, and branded public pages — all on the free plan. Most independents are live in under an hour.
Frequently asked questions
Most independent restaurants can launch a working digital menu in 30–60 minutes on a dedicated menu platform. If you use AI menu import to read an existing PDF or photo of your paper menu, you can be live in under 10 minutes. Adding photos, multiple languages, or ordering extends that, but the base setup is fast.
You can launch a full digital menu for free. Tappflow's free plan includes unlimited menu items, one restaurant, QR code generation, NFC-ready URLs, and 44+ language translations — no credit card required. Paid plans add multi-location support, unlimited staff seats, and advanced analytics for venues that outgrow the free tier.
No — and they shouldn't. A modern digital menu opens directly in the phone's browser when the guest scans a QR or taps an NFC sticker. No app install, no account, no email wall. Forced app installs are the single biggest reason guests abandon digital menus; skip any platform that requires one.
On Tappflow, open the menu editor, click Languages, and select the languages you want — Arabic, Spanish, Mandarin, French, Urdu, Hindi, Japanese, and 37 more are supported. The platform auto-translates sections, item names, descriptions, and dietary tags, and renders the menu in whichever language the guest's phone is set to. No manual re-translation when you edit an item.
Open any item in the menu editor and toggle the dietary tags — Halal, Kosher, Vegetarian, Vegan, Gluten-Free, Dairy-Free, Nut-Free, and spice level are all supported. The tags display as icons on the public menu so guests instantly see what they can eat without flagging a server.
Yes. Edit a price, mark an item sold out, or add today's special in the dashboard and the change is live for every guest within a second or two. No reprinting, no staff-side tickets. Before committing to a platform, test the update speed: change a price, wait 30 seconds, and reload the menu on a different phone to see what propagates.
A QR menu is a printed code the guest scans with their phone camera to open your digital menu. An NFC menu is a small sticker or tag the guest taps their phone against — no camera, one tap. Both open the same page. QR is free to print; NFC feels more modern and has lower friction. Most full-service restaurants ship both on the same table tent.
No. A digital menu just displays your menu. Online ordering adds a checkout step. You can start with a digital menu today and layer ordering on later if it fits your service model — takeout and QSR benefit most; full-service venues should think twice before short-circuiting the server.
Yes. Your public menu page is a full, mobile-optimised web page indexed by Google — with structured menu items, cuisine type, and contact info. Restaurants with online menus rank meaningfully better for searches like 'best halal food near me' or 'vegan restaurant downtown' because Google can actually read the menu, not just a PDF blob.
No. Most restaurants keep a small stack of printed menus at the host stand for guests who prefer paper, guests with dead phones, and the occasional power outage. Use the digital version for daily specials, dietary tags, multi-language, and instant updates. Digital-first is not digital-only.
See Tappflow at work in your restaurant
NFC tags, a digital menu, and instant updates — built together so you never reprint a menu again.